


9
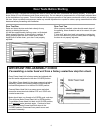
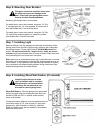
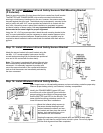
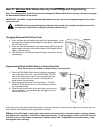
Step 9: Installing Deluxe Wireless Wall Station (if included)
Install all wall controls out of the reach of
children and in a location where the door
can be seen before activating. Do not
mount push buttons near or next to ga-
rage door.
Locate a convenient place to mount wall station. To keep wall sta-
tion out of the reach of children, measure at least five feet up from
the floor and secure wall station base into wood wall framing using
(2) Phillips head screws. Pilot drill mounting holes using a 3/32" bit.
Use 2 of 3 holes that best align with wood framing.
CAUTION: Over tightening the screws could deform plastic base
and interfere with circuit board snaps.
NOTE: Insert bottom of circuit board behind bottom snap of wall
station base. Pivot circuit board up until board snaps into place.
For best results, press on circuit board between battery terminals.
Insert battery onto circuit board being careful to match (+) positive
battery marking with (+) circuit board marking. Align wall station
cover/button assembly with base. Press cover assembly over base
until cover snaps into place. A uniform seam between the cover
and base indicates a proper installation.
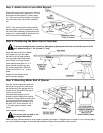
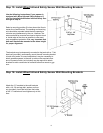
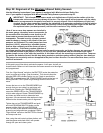
Step 10: Install Entrapment Warning Label
Install Entrapment Warning Label next to
wall station in a prominent location
Install Entrapment Warning Label next to Wall Station as
illustrated. If label adhesive will not adhere to the sur-
face, secure the label by additional mechanical means
such as staples, nails or screws.
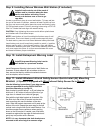
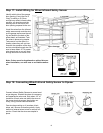
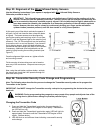
Step 11: Install Wireless Infrared Safety Sensor Quick-Install (QI) Mounting
Bracket.
(If Opener is Equipped with Wired Infrared Safety Sensor Go to Step 15)
Use the following instructions if your door tracks
come pre-punched for using QUICK-INSTALL
brackets otherwise go to step 12.
Each bracket is marked either L or R just below the
slide lock. (L & R refers to left and right side of ga-
rage door as viewed from inside the garage).
Start with the right side bracket as illustrated. Slip
the Slide Lock tab of the QI bracket into the door
track mounting slot near the bottom of the door
track. Slide the bracket downward until it seats at the
bottom of the slot. Repeat the same step for the left
vertical track using the left Quick Install Bracket. You
should encounter some resistance when pushing
down on the QI-bracket. If needed, use a flat blade
screwdriver against the top edge of the bracket and
gently tap into position with a hammer.
NOTE: It is very important that both brackets are
mounted at the same height so sensors align.