


7
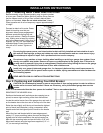
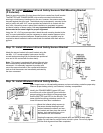
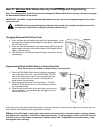
Step 3: Attach Unit to Front Wall Bracket
Raise the front end of the opener and attach it
to the front wall bracket, using the ¼” x 4” hex
head bolt and the supplied ¼” plastic insert
nut. Take care not to over tighten nut; tighten
only until end of bolt is flush with outside of
nut.
NOTE: If you have a torsion spring counter-
balance system, it will be necessary to raise
the motor Head Assembly of the opener and
support it on a step-ladder to attach the front
end of the opener to Wall Bracket.
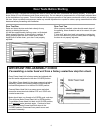
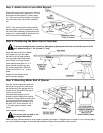
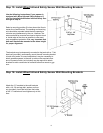
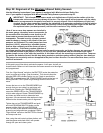
Step 4: Positioning the Motor End of Operator
To prevent damage to steel, aluminum, fiberglass or glass panel doors do not rest the opener of the
door without using a 2” x 4” at least 12” long.
Raise the motor end of the opener
and support it so you can open
the door to its fully open position.
You may need help raising motor
end if ladder is not high enough.
Open the door and place a 2” x 4”
piece of wood along the top sec-
tion of the garage door. Rest the
double rails on the 2” x 4”, as illus-
trated.
Support the top section of the
door to prevent sagging.
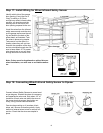
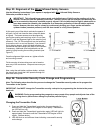
Step 5: Mounting Motor End of Opener
Align the center of opener tracks with
the center line previously marked on
the top section of the garage door to
ensure rail will be parallel with the di-
rection of door travel.
Use perforated hangers (cut as
needed to adjust length) from ceiling
or beams to hang opener at motor end
(be sure to locate and mount to solid
structural beams, as illustrated). Pre-
drill with 3/16” drill bit and use 1/4” x
1-1/2” lag screws to ensure a rigid
mount.
Attach opener to hangers.
Do not use gear cap bolt or nut
for hanger attachment!
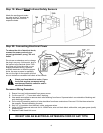
Note: Hanging brackets should be at an angle to provide rigid support. If hangers have no angle or if you use long hang-
ers, cross brace the hangers to eliminate the possibility of sway during operation of the opener.