


1 L80-029 Rev 5 10/07
Theory of Operation:
A natural gas burning appliance requires roughly 10 cubic feet of air to properly combust a single cubic foot of
gas. Minute airborne particles entrained during this process pass through the combustion system and are
incinerated. However, some particles may be trapped within the combustion system, building up over time,
causing an eventual decrease in the operational efficiency of your appliance. The rate at which this build up
may occur varies from kitchen to kitchen and is greatly influenced by the environment (breading, flour etc.) and
kitchen processes (i.e. cleaning). Historically, frequent cleaning of burners and other combustion related
components has been the only way to insure optimal efficiency of your fryer. The Pitco Self Cleaning Burner
System (SCBS) will minimize the cost and inconvenient down time of frequent cleaning of combustion system
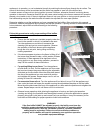
components. Each morning when the appliance is turned on, a small amount of gas is momentarily diverted
into a runner tube, which, after passing by the pilot, ignites and causes a short but effective light back at the
main burner orifice. This brief flame bath cleans the inside of the burner face by incinerating any foreign matter
that has accumulated from the previous day’s operation.
The Pitco Self Cleaning Burner System is designed to help maintain proper operation and efficiency of your
appliance’s combustion system by minimizing the build up of any foreign material inside the burner housings.
Proper installation of this upgrade and periodic maintenance of the appliance are critical to safe, reliable and
efficient operation.
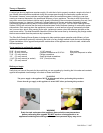
Tools required to perform this upgrade:
5/16” (8 mm) wrench 1 1/16” wrench Wire cutters
5/16” (8 mm) nut driver Cordless screwdriver w/ 5/16” bit Pipe joint compound or teflon
7/16“ (12 mm) wrench Phillips screwdriver tape
1/2“ (13 mm) wrench Small flat blade screwdriver
11/16” (18 mm) wrench (or socket) 3/16” (5 mm) hex key
7/8” (23 mm) wrench
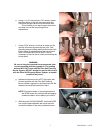
Before you begin:
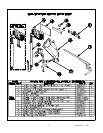
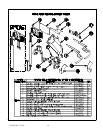
Verify that you have all the parts for the model that you are upgrading by checking the kit number and contents
against the exploded view drawings in the back of these instructions.
WARNING
The power supply to the appliance MUST be disconnected before performing this procedure.
WARNING
Ensure that the gas supply to this appliance is turned OFF before performing this procedure.
WARNING
Drain the tank and ensure that appliance has cooled to room temperature
before performing this upgrade. DO NOT work on a hot appliance or an
appliance containing hot cooking medium; serious personal injury may occur.