


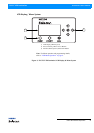
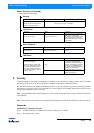

Installation & User’s Manual PLCYC LED Luminaires
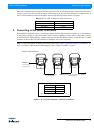
8 INSTALLATION AND SET UP
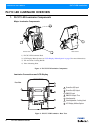
4. Mounting
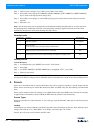
PLCYC LED Luminaires offer a plastic monocoque
yoke design for mounting by theatrical clamps or
hooks (sold separately).
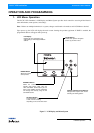
For optimum performance and use, PLCYC LED
Luminaires should be mounted and spaced as shown
in Figure 5.
How to read Figure 5:
• S = Spacing between fixtures
• D = Distance from fixture to projection surface.
• A ratio of S = D x 0.9 is the formula used to cal-
culate the optimum spacing for these fixtures.
WARNING! Before attempting any installation or
service, disconnect all power at power source.
Turning off the output of the luminaire does not
disconnect power. Installation and service should
only be performed by a trained and qualified
professional. Be sure to check circuit capacity
before installing luminaires.
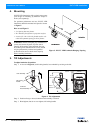
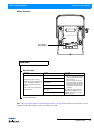
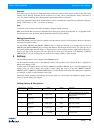
5. Tilt Adjustments
To adjust luminaire tilt position:
Step 1. As shown in Figure 6, at tilt locking handle, loosen handle by twisting to the left.
Figure 6: Tilt Adjustments
Step 2. Position tilt (up or down) luminaire head assembly as desired.
Step 3. Hand-tighten, but do not over tighten, tilt locking handle.
S
D
Figure 5: PLCYC LED Luminaire Hanging / Spacing
R 5.7 in. /
143.5 mm
R 7.7 in. /
195.0 mm
1.2 in. /
30.2 mm
6.7 in. /
170.5 mm
9.5 in. /
240.4 mm
Tilt Locking
Yoke Assembly
Luminaire
Head Assembly
Handle