Optional Sill Pan Instructions:
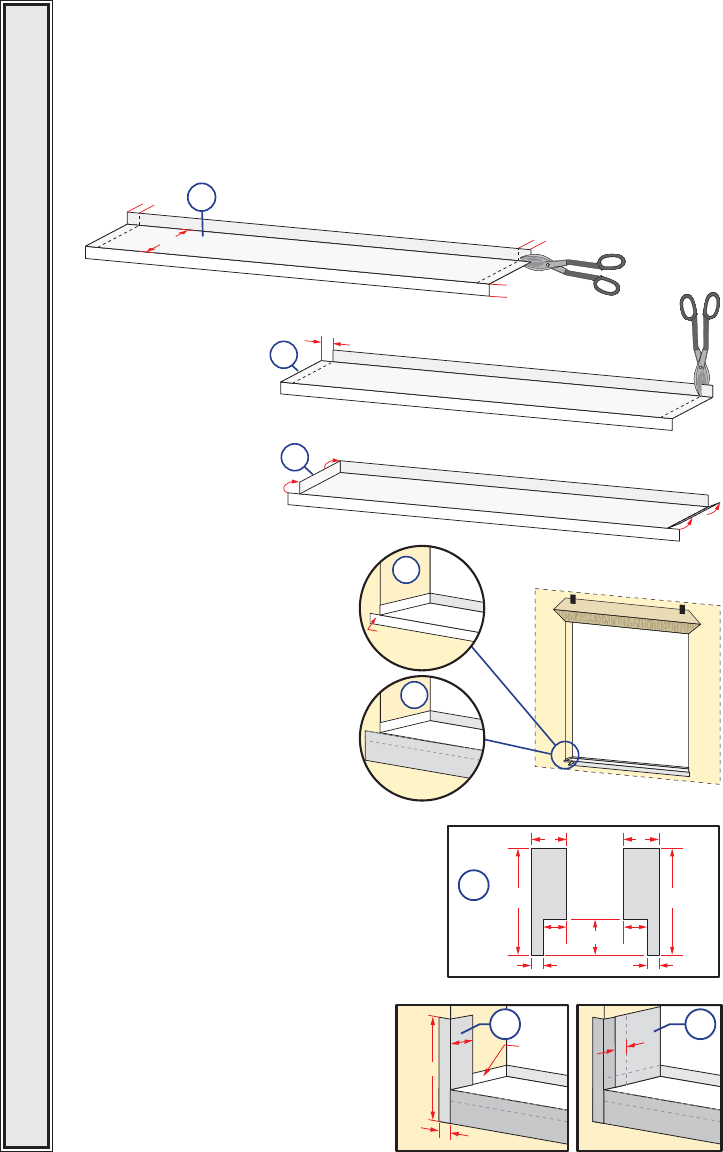
I. Cut the sill pan to the width of the rough opening plus 2”.
Note: e 2” added onto the rough opening width is for a 1” bend on each end.
J. Make a 1” cut in each fold at both end of the sill pan.
Note: ese cuts will allow the edges of the sill pan to be bent.
Note: 4-5/8” wide for Out-Swing and In-Swing for 4-9/16” wall condition. For other wall
conditions, measure wall depth and add 1/16”.
INTERIOR SILL PAN LIP
EXTERIOR SILL PAN LIP
1"
1"
Variable
1J
1"
INTERIOR SILL PAN LIP
EXTERIOR SILL PAN LIP
1"
1K
INTERIOR SILL PAN LIP
EXTERIOR SILL PAN LIP
1L
Exterior
1M
EXTERIOR SILL PAN LIP
Install flush
against exterior
rough opening.
1N
EXTERIOR SILL PAN LIP
Flashing Tape
Weather Barrier
K. Cut 1” of each end
of the interior sill
pan lip.
L. Bend each end of the
center panel up.
M. Install the sill pan by sliding into
place until the exterior sill pan lip is
ush with the exterior of the rough
opening.
N. Apply sill ashing tape. Cut a piece of
ashing tape 2” longer than the opening
width. Apply at the bottom of the
opening, covering the exterior sill pan
lip as shown.
Note: If applicable, apply spray
adhesive to building felt prior to
applying the ashing tape.
O. Cut two 9” pieces of ashing tape with a 1”
x 3”tab at the bottom, on opposite corners as
shown.
9"
3"
1" tab
3"
2"
9"
1" tab
3"
2"
1O
EXTERIOR SILL PAN LIP
Flashing Tape
9"
1"
2"
Side
Flange
1P
EXTERIOR SILL PAN LIP
Flashing Tape
1"
1Q
P. Apply the tabbed 9” pieces of ashing
tap. e tape is applied so 2” will cover the
inside of the rough opening and lap over
the side ange of the sill pan. e 1” x 3”
tab laps over the bottom ashing tape as
shown.
Q. Cut two 6” pieces of ashing tape and
apply to each side of the rough opening,
overlapping the rst piece by 1” and
lapping the bottom over the side ange of
the sill pan as shown.
DOORS • ALL DOORS • ALL DOORS • ALL DOORS • ALL DOORS • ALL DOORS • ALL DOORS


