


3
CABLE CLAMP INSTALLATION (CONTINUED)
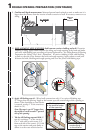
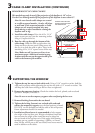
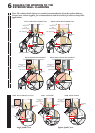
A. Tighten the top hex nut on both cable ends. Using a 3/16" wrench or socket, hold the
cable end in position while tightening the top hex nut with a 1/2" wrench or socket. is
will keep the cable from twisting as the hex nuts are tightened.
4
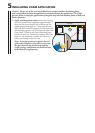
SUPPORTING THE WINDOW
B. Remove the temporary bracing. Check the window for level, plumb, sash reveal and
operation. Readjust, if needed.
Note: Be sure to use the temporary support when readjusting the hex nuts.
C. Remove blocking from under the seat board.
D. Tighten the locking (bottom) nut on both cable ends and
remove the temporary support once the nal position is found.
DO NOT cut the threaded end o the cable as this will prevent
future adjustment should it be needed.
E. Installation of knee braces is recommended to help support
the weight of the bay/bow unit. Weight calculations must take
into account the weight of the items that may be placed on
the seat board of the bay/bow unit. If the upper roof/framing
members are not capable of supporting 1,300 lbs. or if more
than 500 lbs. will be put on the seat board, knee braces must be
used in addition to the cables.
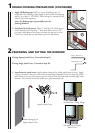
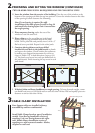
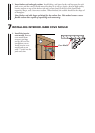
HEAD BOARD
SEAT BOARD
18" PROJECTION
MAXIMUM
DASHED LINES INDICATE
POSSIBLE CONSTRUCTION
FOR GABLE ROOF
MINIMUM
10-1/2”
HEADER MOUNT OF CABLE CLAMPS
is method may only be used if the projection of the bay/bow is 18" or less.
Use the Cross Bracing method if the projection of the bay/bow is more than 18".
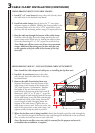
Note: Be sure that the cable clamps are secured
to a solid structural member - header, sill plates
or wall stud. If the structural member or cable
clamps are not securely attached, they may
loosen during or after installation causing the
bay/bow unit to sag.
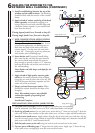
A. Install the cable clamps. Drive the #12 x 3-1/4"
square screws part way into the mounting surface
using a #3 square drive bit.
B. Run the cable up through the bottom of the
cable clamp. Hold the cable up tight above the
clamp and drive the two center clamp screws all
the way in to lock the cable in place. Drive in the
remaining #12 x 3-1/4" square screws all the way.
Note: Make sure all 4 screws are driven in at
maximum torque. Additional tensioning may
be done with the nuts on the opposite end of the
cable at the bottom of the window.
4E
ALLALLALLALLALLALLALLALLALLALLALLALLALLALLALLALLALLALLALLALLALLALLALLALLALLALL