


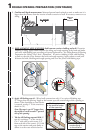
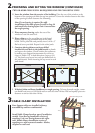
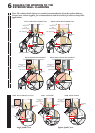

CROSS BRACING MOUNT OF CABLE CLAMPS
A. Install 2" x 6" cross braces between rafter tails, directly above
the cable holes in the bay/bow head board.
B. Install the cable clamps directly above the "T" nuts where
adequate support is available. Holding the clamp parallel to the
up-running cable, drive the #12 x 3-1/4" square drive screws
part way into the mounting surface using a #3 square drive bit.
C. Run the cable up through the bottom of the cable clamp.
Hold the cable up tight above the clamp and drive the two
center clamp screws all the way in, locking the cable in place.
Drive the remaining #12 x 3-1/4" square screws all the way.
Note: Make sure all four screws are driven in at maximum
torque. Additional tensioning may be done with the nuts
on the opposite end of the cable at the bottom of the bay/
bow unit.
3B
3C
HEAD BOARD
SEAT BOARD
1"
A
B
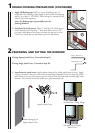
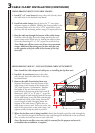
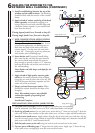
CROSS BRACING MOUNT - NON ACCESSIBLE CABLE ATTACHMENT
Note: Install the cable clamp and cable prior to installing the bay/bow unit.
3
CABLE CLAMP INSTALLATION (CONTINUED)
A. Install 2 x 6 cross braces between the rafter
tails, directly above the cable holes in the bay/
bow head board.
B. Remove the cable from the bay/bow unit.
Measure the distance from the bottom of the
cable clamp to the bottom of the header plus
3/8" head clearance (A dimension). Measure
the height of the unit from the top of the
head board to the bottom of the seat board (B
dimension). Add "A" to "B" plus 1", to get the
correct length of cable hanging from the bottom
of the cable clamp. Insert the cable end through
the round hole of the cable clamp. Ensure the
correct length of cable is hanging below the
bottom of the cable clamp. Tighten the two
cable clamp corner screws. Insert one screw into
each of the center holes in the cable clamp, and
tighten to fully clamp the cable in position.
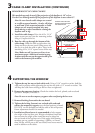
C. When the bay/bow unit is being installed, thread the threaded end of the cable through the
"T" nut, down the length of the bay/bow unit, and through the drilled hole in the seat board.
Place a washer and two hex nuts on each cable end.
Note: e interior mullion cover can easily be removed for this purpose and must be
reinstalled when installation is complete.
ALLALLALLALLALLALLALLALLALLALLALLALLALLALLALLALLALLALLALLALLALLALLALLALLALLALLALLALLALLALLALL