


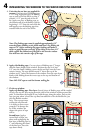
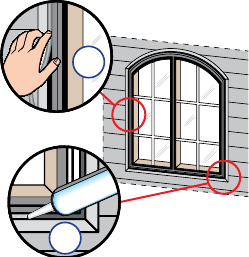
The exterior frame and sash are protected by aluminum cladding with our tough EnduraClad
®
or
%NDURA#LAD0LUSBAKEDONFACTORYlNISHTHATNEEDSNOPAINTING#LEANTHISSURFACEWITHMILDSOAPAND
water. Stubborn stains and deposits may be removed with mineral spirits. DO NOT use abrasives.
DO NOT scrape or use tools that might damage the surface.
Use of inappropriate finishes, solvents, brickwash or cleaning chemicals will cause adverse reactions
with window and door materials and voids the Limited Warranty.
EXTERIOR FINISH
Care and maintenance information is available in the Pella Owner’s Manual. You can obtain an owner’s
manual by contacting your local Pella retailer. This information is also available on www.pella.com.
CARE AND MAINTENANCE
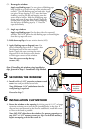
If products cannot be finished immediately, cover with clear plastic to protect from dirt, damage and
MOISTURE2EMOVEANYCONSTRUCTIONRESIDUEBEFORElNISHING3ANDALLWOODSURFACESLIGHTLYWITH
GRITORlNERSANDPAPER$/./4USESTEELWOOL"%#!2%&5,./44/3#2!4#(4(%',!33
Remove sanding dust.
Pella products must be finished per the below instructions; failure to follow these instructions voids the
Limited Warranty.
s/NCASEMENTANDAWNINGSITISOPTIONALTOSTAINORlNISHTHEVERTICALANDHORIZONTALSASHEDGES
s/NSINGLEHUNGANDDOUBLEHUNGDONOTPAINTSTAINORlNISHTHEVERTICALSASHEDGESANYlNISH
on the vertical sash edges may cause the sash to stick; it is optional to paint, stain or finish the
HORIZONTALSASHEDGES
s/NPATIODOORSITISOPTIONALTOPAINTSTAINORlNISHTHEVERTICALANDHORIZONTALPANELEDGES
Note: To maintain proper product performance do not paint, finish or remove the weather-
stripping, mohair dust pads, gaskets or vinyl parts. Air and water leakage will result if these
parts are removed. After finishing, allow venting windows and doors to dry completely before
closing them.
Pella Corporation is not responsible for interior paint and stain finish imperfections for any product
THATISNOTFACTORYAPPLIEDBY0ELLA#ORPORATION5SEOFINAPPROPRIATElNISHESSOLVENTSBRICKWASHOR
cleaning chemicals will cause adverse reactions with window and door materials and voids the
Limited Warranty.
For additional information on finishing see the Pella Owner’s Manual or got to www.pella.com.
9 INTERIOR FINISH
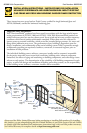
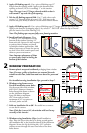
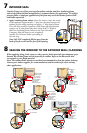
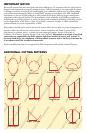
A. Insert backer rod into the space around the window to provide approximately
CLEARANCEBETWEENTHEBACKERRODANDTHEEXTERIORFACEOFTHEWINDOW
Note: Backer rod adds shape and depth for the
sealant line.
#
"
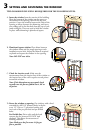
B. Apply a bead of high quality exterior grade sealant to
the entire perimeter of the window.
Note: For wood siding applications, when using the
flexible fin, ensure the sealant bead covers the exterior
edge of the fin weather-strip.
C. Shape, tool and clean excess sealant. When finished,
the sealant should be the shape of an hourglass.
Note: This method creates a more flexible sealant
line capable of expanding and contracting.
8
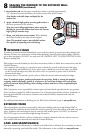
SEALING THE WINDOW TO THE EXTERIOR WALL
CLADDING (continued)