


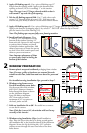
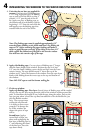
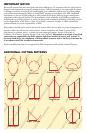
C1. Rectangular window:
Apply top flashing tape. Cut two pieces of flashing tape
long enough to go across the top of the window and
EXTENDPASTTHEmASHINGTAPEONBOTHSIDES!PPLY
ONEPIECEOFTAPELAPPINGITONTOTHEFRAME
cladding, covering the fin and lapping onto the
water resistive barrier. Fold the overlapping tape
down, and press all tape down firmly. Apply the
second piece of tape just above and overlapping
THElRSTPIECEOFmASHINGTAPEBY0RESSTHE
tape down firmly.
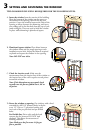
# Angle top window:
Apply top flashing tape. /NTHESHORTSIDEOFATRAPEZOID
window, DO NOT allow the side flashing tape to extend higher
than the top tape will cover.
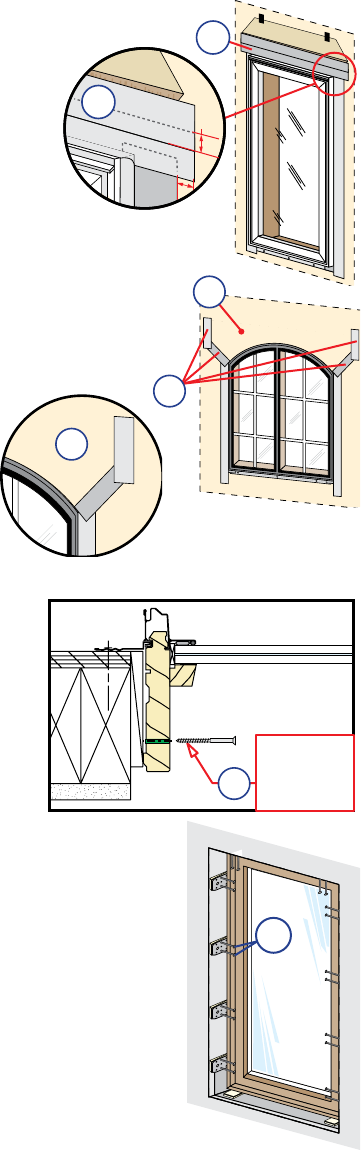
D. Fold down top flapOFWATERRESISTIVEBARRIER$
$
$
&YUFSJPS
%
&
E. Apply flashing tape to diagonal cuts. Cut
PIECESOFmASHINGTAPEATLEASTLONGERTHAN
the diagonal cuts in the water resistive
barrier. Apply the tape covering the entire
diagonal cut in the resistive water barrier
at both upper corners of the window.
Note: Be sure to overlap the top
corners (4E).
&
5
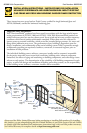
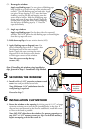
SECURING THE WINDOW
A. Install a #10 x 3-1/2" corrosion resistant wood
screwINTOEACHPREDRILLEDSCREWHOLE
Note: Minimum 1-1/4" embedment into the
wall framing is required.
5A
#10 x 3-1/2"
corrosion
resistant
wood screw
6
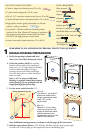
INSTALLATION CLIP METHOD
A. Fasten the window to the opening BYDRIVINGTWOvORLONGER
CORROSIONRESISTANTSCREWSINTOTHEPREPUNCHEDHOLESINTHECLIPS)F
clips are bent and fastened to the interior stud/block, install the screws
as close to the bend as possible.
Note: DO NOT shim above the window. For masonry openings use
two 3/16” x 1-1/2” masonry screws per clip. Pre-drill the masonry
before attempting to drive the screws in.
INTERIOR
6A
Note: If installing the window using installation
clips, proceed to Step 6 - Installation Clip Method.
Proceed to Step 7.