


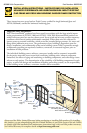
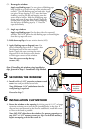

E. Apply sill flashing tape #1.#UTAPIECEOFmASHINGTAPE
longer than the opening width. Apply at the bottom of the
OPENINGASSHOWN%SOITOVERHANGSTOTHEEXTERIOR
Note: The tape is cut 12" longer than the width so that it
will extend 6" up each side of the opening.
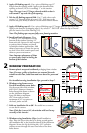
A. Remove plastic wrap and cardboard packaging from window.
Note: If screens, grilles or hardware are removed from the
window at this time, label them and store them in a protected
area.
For installation using installation clips, preceed to Step C.
2
WINDOW PREPARATION
&
'
(
)
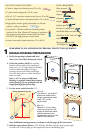
F. Tab the sill flashing tape and fold.#UTWIDETABSATEACH
CORNERFROMEACHSIDEOFCORNER&&OLDTAPETOTHE
exterior and press firmly to adhere it to the water resistive barrier.
'Apply sill flashing tape #2.#UTAPIECEOFmASHINGTAPELONGERTHANTHEOPENINGWIDTH
!PPLYATTHEBOTTOMOVERLAPPINGTAPEBYATLEAST$/./4ALLOWTHETAPETOEXTEND
PASTTHEINTERIORFACEOFTHEFRAMING'
Note: The flashing tape may not fully cover framing members.
H. Install and level sill spacers. Place
WIDEBYTHICKSPACERSONTHE
BOTTOMOFTHEWINDOWOPENING
from each side. Spacers are also required
at points where windows are joined
in multiple window applications. Add
shims as necessary to ensure the spacers
are level. Once level, attach spacers and
shims to prevent movement.
Note: Improper placement of shims
or spacers may result in bowing the
bottom of the window.
C. Fold out installation fin to 90°. Be careful not to remove
or tear the fin corners.
Note: If the fin is not at 90°, the window will not line up
correctly on the interior.
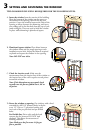
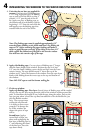
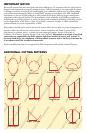
B. Windows using frame screws:
Pre-drill installation screw holes.
On the room side of the window,
DRILLDIAMETERCLEARANCE
holes through the frame as shown
on the placement diagram.
Space the holes a maximum
OFFROMEACHENDANDA
MAXIMUMOFONCENTERON
the head, jambs and sill.
$MBE'SBNF4JMM
%SJMM
DMFBSBODFIPMF
#
6"
MAX
6"
MAX
10"
MAX
10"
MAX
10"
MAX
6"
MAX
10"
MAX
10"
MAX
6"
MAX
FOR PLACEMENT
OF FRAME
SCREWS AND
INSTALLATION
CLIPS
$
D. Windows using Installation Clips: Install installation
clips. Place the clip so that the lip is facing up and against
the installation fin, at the locations shown in the placement
DIAGRAM3ECURETHECLIPBYDRIVINGXvCORROSION
resistant screws through the outer two holes of the three
holes shown.
6“ from end
Lip
#6 x 5/8” corrosion
2D
resistant screws