


3F
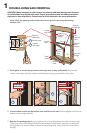
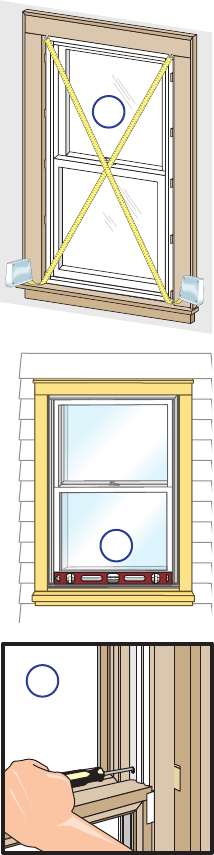
F. Place shims approximately 5" up from the bottom of
window to plumb and square the window. Check for
squareness by making sure the diagonal measurement
from corner to corner is within 1/16" in both directions. Also
place shims in line with the jamb hole near the center of the
unit. Trim shims back so they recessed back 1/4” - 1/2” from
the interior face of the window frame.
For windows over 53" tall: Place two additional shims along
each side of the window, evenly spacing them between the
top and bottom shims and the midpoint shim.
G. Check the new sill to confirm it is flat and level using a level
or straight edge along the exterior edge of the new sill. If
the sill is bowed (humped) screen t issues may result.
3I
EXTERIOR
3G
Note: To Resolve Sill Bow (hump):
• Push Down on the center of the sill to seat the adjustable
sill adapter.
• Check the shims at the sill for proper location. (See Step
2B).
• If the sill adapter is touching the existing (old) sill, remove
the sill adapter to relieve pressure on the new sill.
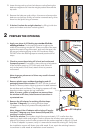
H. Cut the checkrail band at each jamb and remove. Check
jambs for straightness by measuring the top, middle and
bottom of the frame. Widths should be within 1/16".
Designer Series only: After cutting the checkrail band, push
the remaining tails of the band into the jambliner hole.
I. Adjust the screw jacks if required. With a flat blade
screwdriver turn clockwise to move the frame toward the
sash.
Architect Series Units: The jamb jack holes are located in the
interior balance channel near the checkrail; the lower sash
must be tilted in to adjust the jamb jack.
Note: If the frame and sash are too tight and are
not adjustable using the jamb jacks, the window is
over-shimmed.
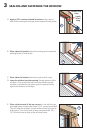
J. Finish driving the top installation screws through the wood
frame jamb, ensuring the head of the screw is flush with the
surface of the wood frame to avoid interference with the
balance assembly.
K. Raise the bottom sash to install the lower two installation
screws. Drive the installation screws below the surface of the
wood frame.
Architect Series Units: The lower installation holes are located in the interior balance
channel near the sill. These holes are not pre-drilled through the wood frame. Drive
the installation screws through the wood frame jamb, ensuring the head of the screw is
below the surface of the wood frame to avoid interference with the balance assembly.
L. Check window operation. Open and close the window a few times to check for proper
operation. Make sure the window will tilt correctly.
Designer Series Only: After adjustments are completed, install plastic plugs in the jamb
liner holes.
Note: If there are any problems with the operation of the window, recheck the shim
locations and adjust for plumb and square.
3
SEALING AND FASTENING THE WINDOW (CONTINUED)