


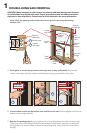

D. Lower the top sash and cut the balance cords allowing the
balance weights to fall into the weight pocket. Remove the
top sash.
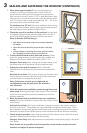
E. Remove the balance cord pulleys. Unscrew and remove the
balance cord pulleys. If they cannot be removed easily, drive
them into the jamb using a hammer.
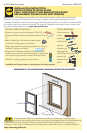
F. If desired, insulate the weight chamber by filling it with low
pressure window and door insulating foam.
1E
2
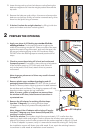
PREPARE THE OPENING
Blind stop
Flashing
Tape
2A
2B
2D
Sill Adapter
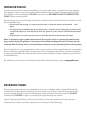
A. Apply one piece of sill flashing tape to the sill of the
existing window. Cut the tape the same length as the
width of the existing window sill. Place one side of the tape
against the vertical leg of the stool, and work the tape into
the corner before applying to the sill. Press down firmly.
DO NOT allow the ashing tape to extend past the blind
stops.
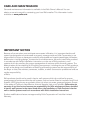
B. Check to ensure the existing sill is level and not bowed
(humped) upward. If necessary, place shims on the bottom
of the window opening 1/2" from each side. Shim sill
only at the jambs. Once level, attach shims to prevent
movement.
Note: Improper placement of shims may result in bowed
(humped) sill.
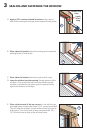
C. Remove plastic wrap, cardboard packaging and sill
packaging board from window. DO NOT cut the checkrail
bands or remove plastic shipping spacers located between
the window sash and frame. The shipping spacers will help
keep the window square during installation.
Note: If screens, grilles or hardware are removed from
the window at this time, label them and store them in
a protected area.
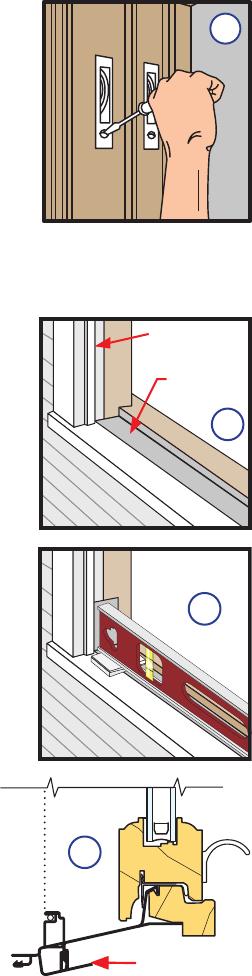
D. Remove the sill adapter for existing sills that slope
less than 13 degrees. For existing sills that slope
13 degrees or more, fully extend the adjustable sill
adapter.
Note: Usage of the sill adapter with existing sill angles
less than 13 degrees may cause bowed (humped) sills,
resulting in screen fit issues.
E. Test fit the window. The window should be approximately 1/2" smaller than the
opening in both width and height. Check to ensure the window rests against the
exterior blind stops and will make contact with the sealant applied in steps 3 A, B and
C. If the sill adpater is present, verify it is extended to meet the existing sill. Verify that
the installation screws will fasten into solid wood. If not, repair the existing frame to
insure there is solid wood at installation screw locations.