


8 C1420M-I (6/09)
Servicing
At a minimum, the enclosure should be recharged once a year. Also, you must recharge the enclosure anytime it is opened for servicing.
DISASSEMBLY
1. Disconnect the power from the enclosure system..
2. Remove the mating connector from the rear of the enclosure by turning the outer ring counterclockwise until you feel a click; then remove
the mating portion of the connector. You may elect to remove the enclosure from its mount, which will make the disassembly process much
easier.
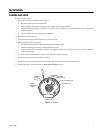
3. Remove the center cap from the Schrader valve (refer to Figure 1 on page 5).
4. Press and hold the center stem of the Schrader valve to relieve internal enclosure pressure.
RECHARGING AND REASSEMBLY
When the enclosure is disassembled for servicing, it should be recharged after reassembly and prior to installation. Recharging requires the use
of a Pelco EH8000RKIT recharge kit (or equivalent) and a Pelco EH8006ORKIT.
To prepare the enclosure for recharging:
1. Once the enclosure has been disassembled, remove the O-ring from the rear plate and install a new O-ring in the O-ring groove in the rear
plate.
2. When the new O-ring has been installed in the rear plate, apply a liberal amount of the Loctite lubricant to the exterior surface of the O-ring
and rear plate. Replace the desiccant bag in the enclosure with a new one The Loctite lubricant and desiccant bag are supplied with the
O-ring kit.
3. Slide the camera sled back into the body making sure the front lip of the sled is under the retaining bracket of the enclosure. When fully
installed, the rear plate will fit firmly into the rear opening of the housing and the retaining groove will be fully visible.
4. Reinstall the spiral retaining ring in the retaining groove in the rear of the enclosure. (Refer to Figure 1 on page 5.)
5. Recharge the enclosure (refer to Pressurizing the Enclosure on page 7).
WARNING: Pressure must be released prior to opening the enclosure or personal injury may result.