


8
Explicit reference is made to the risks of using highly
flammable, combustible, toxic, health-hazardous,
corrosive or irritant substances.
Initial operation
Delivery, instruction on safety procedures, handling
and maintenance and initial operation are generally
carried out by our authorized specialist.
If this is not the case, the operator is responsible for
instructing machine users.
Commissioning/operation
Please remember that the voltage in the building being
cleaned must concur with that given on the machineʼs
type plate.
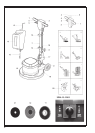
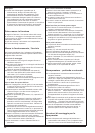
Assembly instructions
The motor head and bar are supplied separately packed.
First release the hexagon socket srews in the shaft
adjustment unit (17).
Then feed the bar (7) gently as far as it will go into the
shaft adjustment unit (17).
Align the handle bar (1) parallel with the wheels (9), so
that the open side of the housing of the top shaft
element (3) is facing to the rear.
Then tighten the hexagon socket screws again.
Wind the electric cable (18) around the handle bar (a)
and cable hook (8).
Preparations for use
Grasp the handle bar (1) with both hands and tip the
machine until it is resting on both wheels (A).
Then wheel the machine to its place of work and plug
the electric cable into the power supply.
Lay the accessories (11), i.e. brush or drive plate with
pad, on the floor.
Now tip the machine back onto the wheels and push
it over the brush (or drive plate) until the drive star
and brush flange are vertically aligned. Lower the
machine onto the brush (B).
Then squeeze the shaft adjustment lever (5) and lower
the bar (7) into its working position. Both arms
should be extended loosely downwards (C).
Align the machine horizontally above the working
element (brush or drive plate), press the switch lock
(4) and press the brush motor switch (2) briefly.
The accessory automatically engages.
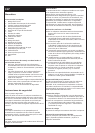
Machine use
Press the brush motor swith (2) (to the right or left). The
motor starts.
If you raise the bar (7) slightly, the machine moves to
the right (D).
If you lower the bar, the machine moves to the left (D).
If you keep the bar in its central position, the machine
works on the spot.
After use
Squeeze the shaft adjustment handle (5) and shift the
bar (7) into its vertical position.
Then tip the machine onto its wheels (9) and press the
brush motor switch (2) briefly. The accessory (11)
disengages.
Remove the plug from the power socket and wind the
electric cable (18) around the handle bar (1) and
cable hook (8).
Thorough cleaning the easy way
For thorough cleaning, the single-disc machine is
supplied with the following accessories:
Liquid tank (13)
Scrubbing brsuh (11) or drive plate with black pad (19).
Fasten the tank to the mounting (14).
Slide the outlet hose (12) onto the water connector (16).
Fill the tank (13). Then fit the brush or drive plate with
pad.
Control the flow of liquid with the tank lever (15) by
pulling the lever (15) upwards.
Vacuum the dirty wash solution a section at a time with
a water extractor.
Shampooing thoroughly and efficiently
For shampooing, the machine is equipped with the
following accessories:
- Liquid tank; 0.3 Perlon shampooing brush or Sapur
pad for textile floorcoverings.
The working procedure is in principle the same as for
thorough cleaning.
Start the machine with the shampooing brush dry.
Meter a small amount of liquid until the bristles are
saturated with foam.
Run the machine with the rotating brush from right to
left or viceversa. Immediately after this, run the
machine in the same way in the reverse direction,
but with an overlap of about a quarter of the strip
already treated (E.)
Only then run the machine in a spiral pattern over the
shampooed strips. In doing so, work both strips at
the same time (F.)
During shampooing it is highly advisable to
immediately remove the dirt-laden foam a section at
a time with a water extractor.
Assembly instructions for Spraymaster
Fit the holder for the spray can to the bar (7) with the
holder pointing upwards and, when viewed from the
operating side, to the left (G).
Hook the spray canʼs tongue onto the holder, pivoting
the holder back until the ball catch engages.
Then slide the spring clip over the shaft adjustment unit
(7).
Attach the box on the right or left as desired (H).
Point the universal-jointed hose in the desired direction.