


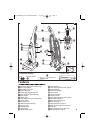

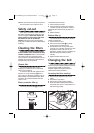
Assembly
B
WARNING: Do not plug in the cleaner
until it is assembled.
1 Carefully unpack all components.
2 Lift cleaner body to upright position.
3 Remove the two screws that are already
attached to the body.
4 From the rear of the cleaner, align the handle
with groove and slide into the body. If
necessary, use thumb and finger pressure to
slide handle into position.
5 Fasten the handle with the two screws.
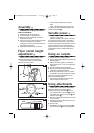
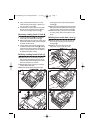
Floor nozzle height
adjustment
C
Before using the cleaner the floor nozzle
height must be set to the correct height.
Choose the setting which most closely
matches your floor surface.
• Use the TOOLS setting when using the
tools.
Note: The height adjustment only comes
into effect when the handle is released by the
handle release pedal È.
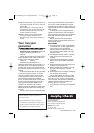
Variable power
D
(Certain models only)
Slide the variable power control to the right
to increase the suction power or to the left to
decrease suction. This feature is most useful
when using the hose and accessories. Use the
minimum setting when vacuuming delicate
fabrics/curtains etc. When not using the hose it
is advisable to keep the variable slider set to
maximum.
Using on carpets
1 Place cleaner in its upright position.
2 Set the carpet height adjustment knob to the
desired position.
3 Release the mains cable by revolving the
quick release cleat
1
/
2
a turn and extend the
cable fully.
4 Plug the cable into the mains socket.
5 Step on the handle release pedal to release
the handle to the desired position.
6 Press the on/off button to the ‘on’ position.
IMPORTANT: To prevent damage to carpets,
never leave the cleaner switched on in one
place for an extended period.
• Never have the brushes set too low such
that the cleaner is hard to push.
Using attachments
Follow steps 1-4 but set the carpet height
adjustment knob to the TOOLS setting.
5 Remove the hose connector Í from the
rear of the cleaner. Lift the hose · from the
top handle hook. Insert the hose clip ˜ into
the hose clip slot Ë.
• Push the required attachment firmly onto the
end of the hose.
• If additional length is required, attach one or
both extension tubes.
6 Switch on/off.
• IMPORTANT: Always fix the hose clip ˜ to
the main body slot Ë when using the hose
4
B
C
min max
D
VC73360MUK-CyclonicBaglessRev3 3/11/05 4:41 pm Page 4