


30 73D0024
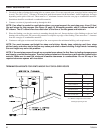
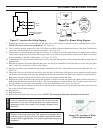
WHITE
BLUE
BLACK
BLACK
BLACK
WHITE
W
HITE
LIGHT
LIGHT
TERMINAL
BLOCK
JUNCTION
BOX
RHEOSTAT
LIGHT
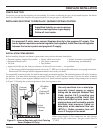
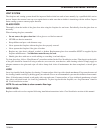
FINAL INSTALLATION
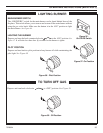
ROCK WOOL PLACEMENT
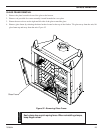
1. Place rock wool on the front burner to provide glowing
embers. For best results, pull the rock wool apart into
dime size pieces and place on top of burner. Also place
the same size ember over the carry over parts on the rear
burner. Do NOT place embers over open slots on the
rear burner.
2. Distribute one layer of rock wool to cover the burner.
See Figure 34 and next page.
3. Place the logs on the burner. See Log Placement below.
Light unit and after 15 minutes, check burner flame and
glow. See Burner Flame, page 40.
Do not use the entire bag of rock wool
to cover the burner. This could cause
the fl ame to burn poorly and may lead
to sooting.
WARNING
Figure 34 - Rockwool placement
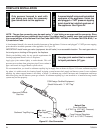
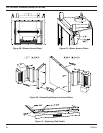
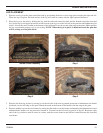
BRICK, LIGHT BULB, AND LENS PLACEMENT
1. Remove the trapezoidal light shroud located at the back of the firebox by unfastening the three screws.
2. Disassemble the trapezoidal light shroud by unfastening the four screws which secure the front to the back. Set lens
with the orange painted surface toward the bottom. Center the lens right to left. Reassemble the front to the back
and set the side.
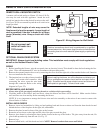
3. Place the right side panel by sliding it at an angle to clear the grate. Set the panel straight up and bring forward until
it comes in contact with the reverse bend located at the front of the firebox. Use one of the brackets and screws
provided to secure the panel in place.
4. Place the rear lower panel by setting it over the channel behind the light socket. Make sure the grout line lines up
with the one on the side.
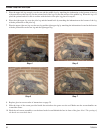
5. NOTE: Have the left panel bracket and screw handy before installing the rear upper panel in place. Place the rear
upper panel in place by resting it over the rear lower panel and sliding it behind the right side panel. While holding the
rear upper panel in place, slide the left panel at an angle to clear the grate. Set the left side panel straight up and release
the rear upper panel. Secure the left side panel in place using the second bracket and screw provided in the kit.
6. Place the front hearth brick simultaneously and pull toward the front away from the burner. This is critical for balanc-
ing air flow around the front burner.
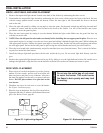
7. Install the halogen light bulb provided with the unit (inside the log set). Do not touch light bulb directly with fin-
gers.
8. Replace the trapezoidal light shroud removed in step #1 by sliding it over the light bulb and sockets. Be careful not to
damage the light bulb. Align the holes on the deflector with the hole on the rear channel and secure in place.
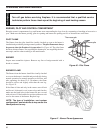
Figure 33 - Light wiring diagram