


20 61D0087
CHIIMNEY INSTALLATION
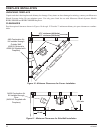
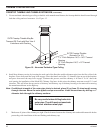
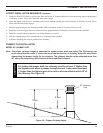
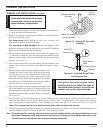
1. Extend the regular chimney sections until the top of the chimney is
4" below the total flue height desired.
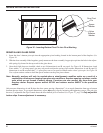
2. Remove the shingles from around the chimney so that the flashing
may be installed and sealed.
For metal roofs: Install flashing on top of roof covering. Nail
flashing down with at least eight (8) nails.
For standard roofing shingles: Remove the shingles from
around the chimney so that the flashing may be installed. Install the
upper part of the flashing under the shingles.
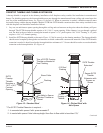
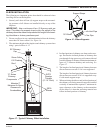
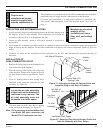
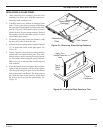
3. Set the flashing on the roof. Scribe a line around the flashing. Cut
1
/4" below the scribed line. This should increase the diameter of the
flashing outlet enough to allow the flashing to be placed over the
chimney. See Figure 19.
4. Seal crack between the top of the flashing and the chimney with
mastic. Leave some excess mastic at this area to be used by Step 6
below.
Use pliers and wear gloves when
handling the storm collar The edge of
the storm collar is sharp. If you are not
careful, you could cut your hands.
CAUTION
CHIMNEY CAP INSTALLATION (CONTINUED)
Figure 19 - Cutting Off Top of the
Flashing
Top of
Flashing
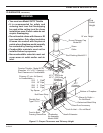
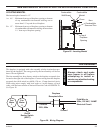
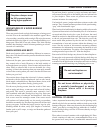
Figure 20 - Installing Storm Collar
and Chimney Cap
Model SC
Chimney Cap
Apply Mastic
Here
Storm Collar
Flashing
7. Place chimney cap into matching parts of the last chimney section. Push chimney cap down until the brackets on the
bottom of the chimney cap sits on the chimney pipe. Punch or drill
1
/8" diameter holes in the inlet air duct (chimney
pipe) where specified on the brackets. Fasten chimney pipe down with the No. 8 screws provided. See Figure 20.
Note: Do not penetrate the inner stainless steel pipe while installing the screws.
8. Check all the parts of the fireplace, chimney and chimney termination cap. Make sure none have been damaged or bent
during installation. Check to see that all parts have been properly installed.
Note: The metal used for chimney cap has a rust-protective coating but the cut edges of the parts are not
protected. Detergent-wash and paint exposed parts of chimney cap with galvanized primer paint.
This will prevent rusting and rust staining of nearby structures.
5. Place the storm collar around the chimney and put collar
together like a belt in belt loops. With the loops facing
up, slide the end of collar under the two loops on the
other end. Overlap the ends of the collar until it is tight
against the chimney. Bend the free end of the collar back
over the loops to hold the storm collar securely together.
Trim off the excess ends of the storm collar.
6. Slide storm collar down snugly against the flashing until
the excess mastic left in step six is forced up into crack
between the storm collar and chimney. This will make the
joint between the flashing and the chimney watertight.
See Figure 20.
Be careful to avoid electrical shock
hazard when contacting wires to
metal chimney components.
CAUTION
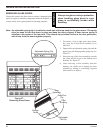
Base of Flashing
under Shingles
Standard Roofing
Shingles