


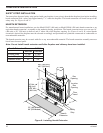
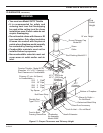
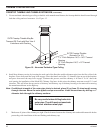


61D0087 17
ELBOW INSTALLATION
The following are important points that should be observed when
installing elbows on the fireplace.
1. Securely nail down all four (4) support straps to the surround-
ing structure of all elbows not installed directly on top of the
fireplace.
IMPORTANT: Use a minimum of two (2) 8-penny nails per
strap. This allows the support strap to carry the weight of the
chimney above the elbow and prevents this weight from break
-
ing the elbow or chimney sections apart.
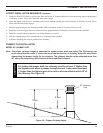
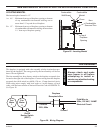
2. Do not use elbows in any combination that inclines the chimney
more than 30° from vertical. See Figure 16.
3. The minimum height of the fireplace and chimney system when
using 1 pair of elbows is 13'
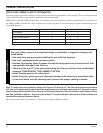
Air Inlet Pipe
Flue Pipe
30° Elbow
Figure 16 - Elbow Supports
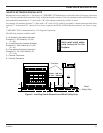
CHIMNEY INSTALLATION
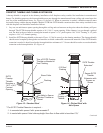
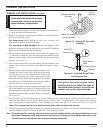
Figure 17 - Typical Chimney Offset Installation
Storm Collar
612 Flashing
Roof
Support Straps
4. Inclined portions of chimney are often used as stor-
age. Enclose the inclined portions of chimney that
pass through living spaces to avoid contact with and
possible damage to chimney. Maintain minimum air
space of 2" between chimney and enclosing. See
Figure 17.
5. The length of inclined portion of chimney between
elbows must not exceed 6' if it is not supported.
The length of inclined portion of chimney between
elbows must not exceed 20' if it is supported every
6' with metal support straps.
6. When enclosing the elbows and inclined portions of
the chimney, enclosing materials must be installed
vertically to maintain the required 2"minimum air
space clearance to the chimney at the extremities
of the offset. It is best that enclosing material not
follow inclined portions of chimney.
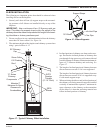
Maintain 2"
Minimum Air Space
Clearance to
Combustibles
SC Chimney
Cap
“S” Series
Chimney
Components
SVTR
Firestop
Thimble
(0°-15° Pitch)
SE30
Elbows