


31
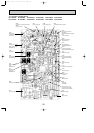
OPERATING PROCEDURE
PHOTOS & ILLUSTRATIONS
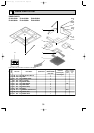
6. Removing the panel
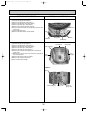
(1) Remove the air intake grille.(See figure 1)
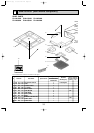
Corner panel (See figure 2)
(1) Remove the corner screw.
(2) Slide the corner panel to the direction of the arrow3, and
remove the corner panel.
Panel (See photo 5)
(1) Disconnect the connector that connects with the unit.
(2) Remove the 2 screws from the panel and loosen another
2 screws, which fix to the oval holes, have different diame-
ters.
(3) Rotate the panel a little to remove the screws.
Photo 6
Photo 5
Photo 4
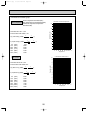
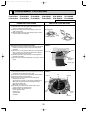
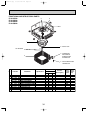
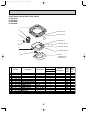
4. Removing the fan motor
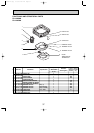
(1) Remove the bell mouth.(See photo 1)
(2) Remove the electrical box.(See photo 2)
(3) Remove the turbo fan nut.
(4) Pull out the turbo fan.
(5) Disconnect the connector of the fan motor lead wire.
(6) Remove the 4 nuts of the fan motor.
Photo 3
Fan motor
Nut
Connector
Pipe temperature thermistor
Service access
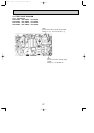
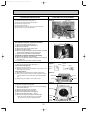
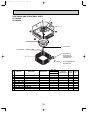
7. Removing the drain pan
(1) Remove the panel. (See photo 5)
(2) Remove the drain plug (Larger one), drain the remaining
water in the drain pan.
(3) Remove the corner cover. (2 screws)
(4) Remove the bell mouth (See photo 1)
(5) Remove the electrical box. (See photo 2)
(6) Remove the lead wire holder. (1 screw)
(7) Remove the 4 screws and pull out the drain pan.
w Pull out the left and right of the pan gradually.
Be careful not to crack or damage the pan.
Figure 2
Corner
panel
Screw
Corner
panel
Panel
Panel
Screw
Connector
Screw
Screw
Screw
Screw
Screw
Drain pan
Drain plug(Larger one) Corner cover
Lead
wire
holder
Nut
5. Removing the pipe temperature thermistor
and condenser evaporator temperature thermistor
(1) Remove the bell mouth.(See photo 1)
(2) Remove the electrical box.(See photo 2)
(3) Remove the turbo fan.
(4) Remove the screw of the service panel.
(5) Remove the service panel.
(6) Remove the pipe temperature thermistor which is inserted
into the holder installed to the thin copper pipe.
(7) Disconnect the 2-pin white connector.(CN21)
[Condenser/ evaporator temperature thermistor]
(8) Remove the drain pan. (See Photo 6)
(9) Remove the thermistor which is installed into the holder to
the indoor coil.
(10) Disconnect the 2-pin black connector. (CN29)
OC370B--2.qxp 07.6.20 2:41 PM Page 31