


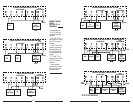
• Set the mode switch to HEAT to program the
unit for controlling your heater. Set the mode
switch to COOL to program the unit for controlling
your air conditioner.
• Touch
MENU
.
• Use
SCROLL
to advance to SET/REVIEW HEAT
PROGRAMS or SET/REVIEW COOL PROGRAMS.
• Touch
YES
to begin scrolling through the HEAT
or COOL settings.
• Use the
UP/DOWN ARROW
to change the
flashing start time for MON MORN. One period
ends at the start time of the next period. The
beginning of a period may not be any closer to the
beginning of the next period than one 15 minute
increment.
• Touch
YES
to accept the displayed start time
and advance to program its set temperature.
• Use
UP/DOWN ARROW
to change the flashing
temperature setting for MON MORN.
• Touch
YES
to accept the displayed temperature
and advance to Set MON DAY start time.
• Use the
UP/DOWN ARROW
to change the
flashing start time for MON DAY.
• Touch
YES
to accept the displayed value and
advance to program temperature.
• Use
UP/DOWN ARROW
to change the flashing
temperature setting for MON DAY.
• Touch
YES
to accept the displayed temperature
and advance to Set MON EVE start time.
• Use the
UP/DOWN ARROW
to change the
flashing start time for MON EVE.
• Touch
YES
to accept the displayed value and
advance to program temperature.
• Use
UP/DOWN ARROW
to change the flashing
temperature setting for MON EVE.
• Touch
YES
to accept the displayed temperature
and advance to Set MON NITE start time.
• Use the
UP/DOWN ARROW
to change the
flashing start time for MON NITE.
• Touch
YES
to accept the displayed value and
advance to program temperature.
• Use
UP/DOWN ARROW
to change the flashing
temperature setting for MON NITE.
• Touch
YES
to accept the displayed temperature
and advance to Set TUE MORN start time.
• Continue programming for each day of the
week.
• Touch
EXIT
to return to main screen.
TIP:
Pressing
Day
,
Time
or
Temperature
while
programming will shift focus to that setting,
allowing it to be edited in the order most
convenient for you.
5.2.1. COPY
COPY will copy the previous days programs into
the current day and advance the thermostat to the
beginning of next day.
6. ADVANCED FEATURES
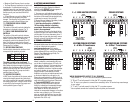
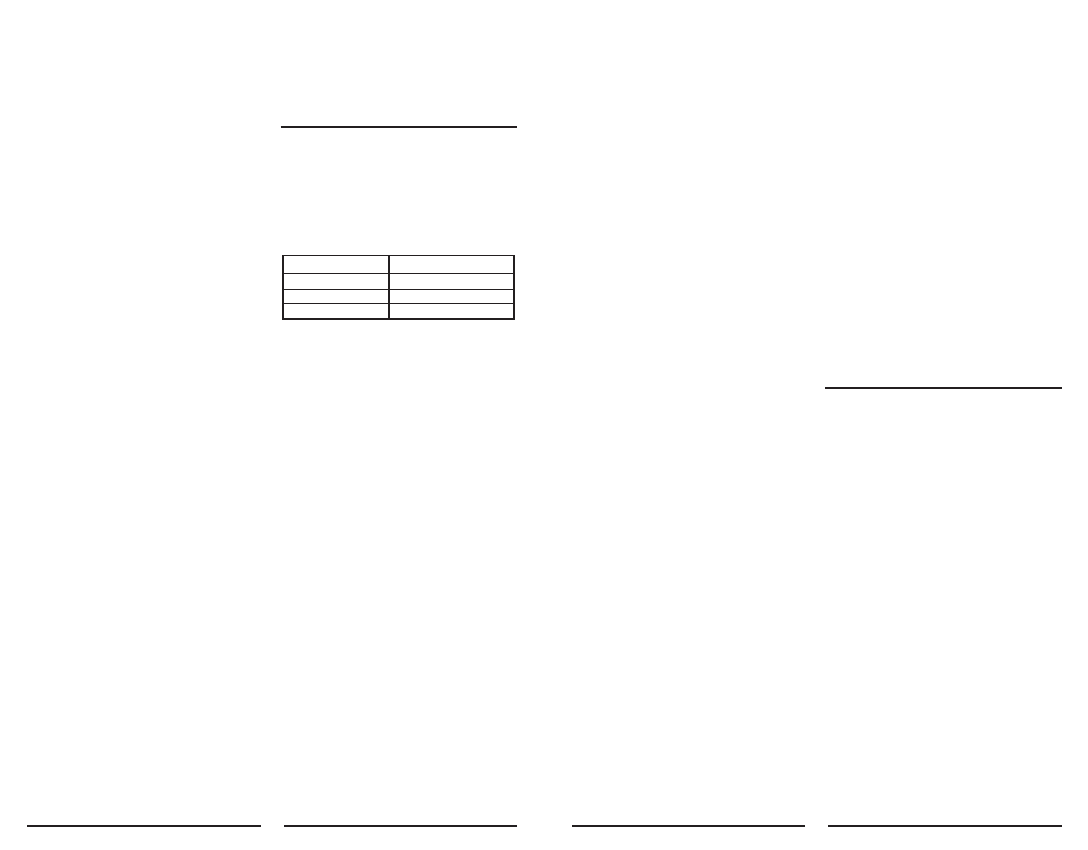
6.1. FILTER USAGE MONITOR
The FILTER MONITOR is used to help determine
when your filter should be changed. It counts the
hours of HEAT and COOL since it was last reset
When the monitor limit is reached the CHANGE
FILTER indicator will become visible. The default
value of 720hrs is normally used for a 90 day filter.
Other values are given in the following table.
To Reset Filter Counter And/Or Change The
Counter Limit
• At the main menu touch
MENU
.
• SCROLL to FILTER USAGE.
• Touch
YES.
Filter Usage Count will appear.
• Touch
NEXT
. RESET will show.
• Touch
YES
to reset the counter and advance to
the filter limit menu, or touch
NEXT
to advance to
the filter monitor menu without resetting the
counter. Limit Hours will be flashing.
• Use
UP/DOWN
arrows to change limit. Set the
filter limit to "0" to disable the Filter Usage Monitor.
• Touch
YES
to accept new count value and
return to the filter counter menu. If a new limit is
set, the filter counter will be reset automatically.
• Touch
EXIT
to return to main menu.
6.2. SWING SETTING
A thermostat works by turning your heating or
cooling system on and off whenever the room
temperature varies a certain number of degrees
from the set-point temperature. This variation is
the "swing." Your system should cycle on about 3
to 6 times per hour. A smaller swing number
increases the number of cycles, so room
temperature is more constant. A larger swing
number decreases the number of cycles, saving
energy in most cases. To change the SWING value
from the main menu:
• Touch
MENU
.
• SCROLL to SWING VALUE.
• Touch
YES
. Adjust Swing Value will appear.
6
30
60
90
240
480
720
FILTER LIFE IN DAYS SET COUNTER HOURS TO
• Use
UP/DOWN
arrows to adjust.
• Touch
EXIT
to return to main display.
6.3. TEMPERATURE CALIBRATION
• From the main menu touch
MENU
.
• SCROLL to CAL TEMP.
• Touch
YES
. CAL TEMP will be visible and
adjustment value will be flashing.
• Use
UP/DOWN
arrows to adjust offset value.
• Touch
EXIT
to return to the main screen.
6.4. ENERGY USAGE MONITOR
A timer in the unit records your system’s ON time
for each mode of the current day, previous day,
and cumulative total to let you see the effects of
your temperature settings and weather conditions.
• Select HEAT to monitor heating energy usage or
COOL to monitor cooling usage.
To view ENERGY/USAGE
• From the main menu touch
MENU
.
• SCROLL to ENERGY USAGE.
• Touch
YES
. The current day’s ENERGY USAGE
will be displayed.
• Touch
NEXT
to view yesterday’s energy use.
• Touch
NEXT
to advance to total ENERGY usage
since the Monitor was last set to zero.
• Touch
NEXT
to display "000". Touching
NEXT
will toggle between the counter value and "000".
• Touch
YES
to accept the current display value
as the counter value. Use "000" to effect a reset.
• Touch
EXIT
to return to the main screen.
6.5. PROGRAM LOCK
The Program Lock allows the owners/operators to
prevent unauthorized changes to the thermostat’s
settings. When the thermostat is locked, a three
digit code is set (000 to 999). That code must be
re-entered before locked settings can be changed
without performing a hardware reset of the unit.
The status of the lock is indicated by an open or
closed padlock icon.
6.5.1. TO SET CODE
• From the main menu touch
MENU
.
• SCROLL to SET KEYBOARD LOCK.
• Touch
YES
. ENTER OLD CODE and both open
and closed padlock icons will be displayed. The
default code is "000".
• Hold
UP/DOWN
arrows to count to code
number.
• Touch
YES
. ENTER NEW CODE will appear.
• Hold
UP/DOWN
arrows to count to code
number (Record Code Number).
• Touch
YES
to accept new code; ENTER OLD
CODE will be visible.
• Touch
EXIT
to return to main display.
6.5.2. TO LOCK SETTINGS
• Touch
OPEN LOCK SYMBOL
on display LOCK
KEY? will appear.
• Touch
YES
. The display will now show a
CLOSED PADLOCK.
6.5.3. TO UNLOCK SETTINGS
• Touch the
CLOSED PADLOCK
. UNLOCK KEY? is
displayed.
• Touch
YES
. ENTER LOCK CODE will be
displayed.
• Hold
UP/DOWN
arrows to count to code
number.
• Touch
YES
to enter code. The OPEN LOCK
symbol will now be displayed in the display.
If you forget your code and the touch screen is
locked, perform a Hardware Reset to unlock it.
With the touch screen unlocked, you may perform
a Software Reset to reset the code to "000".
See
"Hardware Reset" and "Software Reset"
.
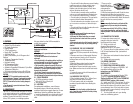
7. SETUP OPTIONS
There are Installation Option switches located
inside the thermostat on the rear of its circuit
board. They control the following:
7.1. TIME DISPLAY FORMAT 12/24 SWITCH #1
The position of this switch controls whether the
time is displayed in 12 hour or 24 hour Military
Time format.
7.2. SMART RECOVERY SWITCH #2
Smart Recovery allows your HVAC system to
attempt to recover from a setback period and
reach your desired comfort temperature set point
by the beginning of your programmed comfort
period. This option allows you to choose whether
to use Smart Recovery.
When enabled, Smart Recovery will initiate if:
• Recovery is from an evening setback to
morning comfort or day setback to evening
comfort period.
• In Heat mode the temperature set point of the
comfort period must be higher than the setback
period.
• In Cool mode the temperature set point of the
comfort period must be lower than the setback
period.
• The estimated Smart Recovery time must be
longer than 15 minutes for a Smart recovery to be
initiated.
7