


18. Verify that the system and its fan are
operating properly. When set to a high
temperature, the heating system should provide
warm air after a short time. Likewise a cooling
system should provide cool air after a short time.
Usually sound from the furnace and air
conditioning units can be heard while they are
running. The rush of moving air should be heard
within a short time after either has been started.
NOTE:
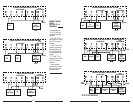
If you have an electric heat system and the blower
does not operate after installation, see figure in
Section 7 to find the electric/gas heat jumper on the
back of the body. Move the jumper to the ELEC
position.
19. Your installation is now complete.
4. OPERATING INSTRUCTIONS
The PSP711TS displays the current time and the
room temperature. It also displays the day of the
week and the current program period, MORN,
DAY, EVE, or NITE. Temperature is indicated near
the center of the display, and time is indicated on
the left. Setting and program changes can be
made with the thermostat body on the wall, or
removed from its base plate.
4.1. SYSTEM MODE SWITCH
The SYSTEM MODE SWITCH has three positions
HEAT, OFF and COOL. Each sets the corresponding
operating mode. In the winter, set the system
switch to HEAT to control your heating system. In
the summer, set the switch to COOL to control
your air conditioner. In spring and fall or when the
windows are open, you can set the switch to OFF.
When thermostat is in the OFF position, neither
HEAT or COOL programs will run.
4.2. FAN MODE SWITCH
The fan switch has two positions; AUTO will only
run your system’s fan as required for heating and
cooling. ON runs your system’s fan continuously.
4.3. UP/DOWN CHANGE ARROW KEYS
While operating the PSP711TS there will often be
two arrow keys visible (just to the right of the
temperature) one pointing up and the other
pointing down. They are used to adjust
temperatures and change other settings.
4.3.1. TEMPERATURE ADJUSTMENT
Touch the displayed temperature once then touch
the UP/DOWN arrow key; it adjusts the flashing
set temperature by one degree in the associated
direction. Holding the key will automatically
advance the setting in the associated direction.
For
simple operation see HOLD.
4.3.2. CHANGING OTHER SETTINGS
If there are many choices for a value, usually that
setting will automatically advance by holding one
of the arrow keys. Some settings though, must be
changed one touch at a time.
4.4. NAVIGATION KEYS
MENU
: Touch this key to begin viewing available
menus.
SCROLL
: Use this key to see the available menu
choices.
YES
: Touch this key to enter a menu. When
present on a menu, touching this key accepts any
setting changes you have made.
NOTE:
Neglecting to accept changes by touching this key
when present, will leave the unit at its previous
setting.
EXIT
:
Touch this key to return to the main
operating screen.
4.5. DISPLAY ILLUMINATION
Press the light bulb button at the lower right
corner of the body to illuminate the display. It will
remain illuminated for 15 seconds. Touching a
field in the screen extends illumination time.
4.6. AUDIBLE BEEP
The PSP711TS will emit an audible beep to
acknowledge that a field in the screen has been
touched.
4.7. ICONS
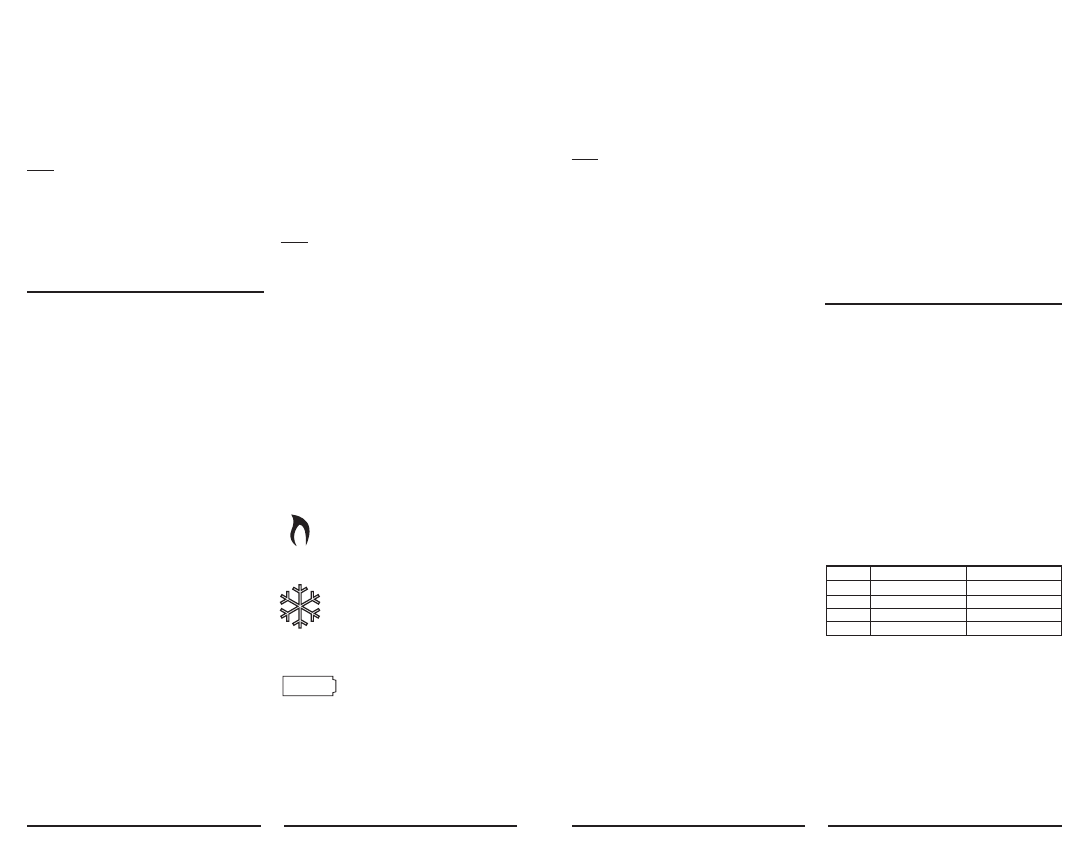
4.7.1 FLAME ICON
In HEAT mode a FLAME icon will be
visible to the right of the current room
temperature. While heating is active, the
FLAME will flash.
4.7.2. SNOWFLAKE ICON
In COOL mode a SNOWFLAKE icon will
be visible to the right of the current room
temperature. While cooling is active, the
SNOWFLAKE will flash.
4.7.3 LOW BATTERY ICON
When the Low Battery level has been
reached, the battery icon will appear.
It will disappear only when fresh
batteries have been installed.
4.8. HARDWARE RESET
This button will unlock the touchscreen and read
option switch positions before the unit resumes
normal operation. Programs and other settings
will be maintained. See jumper and switch
positions figure on Page 12.
4
REPLACE
4.9. SOFTWARE RESET
This reset is disabled while the touchscreen is
locked. When activated it will reset all
programmable values and settings including the
lock code and clock, to their default values. Then
option switch positions will be read before
resuming normal operation. Record your settings
and programs before pressing this button.
NOTE:
• Take care not to inadvertently press the
SOFTWARE
RESET
button while programming your unit.
• Performing a
SOFTWARE RESET
will reprogram all
software settings to their default values.
• Copy your programs into the blank chart provided on
page 12 before using
SOFTWARE RESET
to assist
reprograming.
4.10. SETTING THE DAY AND TIME
SET DAY: Touch displayed DAY, advance with UP
arrow.
Touch displayed DAY again to return to main
screen.
SET TIME: Touch displayed time, set with UP or
DOWN arrows. Touch displayed time again to
return to main screen.
DAY and TIME may also be set from their menu as
follows:
• Touch
MENU
. You should see Set Day/Time
displayed.
• Touch
YES
and day of the week will flash.
• Touch
UP ARROW
to advance to set the day.
• Touch
YES
to accept displayed week day and
advance to SET TIME. Or touch
NEXT
to advance
to set current time without accepting changes.
Time will be flashing.
• Touch
UP/DOWN ARROW
to set the current
time of day.
• Touch
YES
to accept displayed time.
• Touch
EXIT
to return to the main screen, or
touch
NEXT
to rotate back to SET THE DAY.
4.11. TEMPORARY TEMPERATURE OVERRIDE
Temporary temperature override allows you to
change the current Set Temperature in Heat or
Cool until the next program period without
changing your temperature control programs.
• Touch displayed temperature; the screen will
flash your SET TEMPERATURE. UP/DOWN arrows
will become visible.
• Use UP/DOWN arrows to change the
temperature setting while it is flashing. OVERRIDE
will be indicated at the top of the display.
• OVERRIDE will be automatically canceled at the
start of the next program period.
• OVERRIDE will be cancelled if the set
temperature is adjusted to its programmed value
or if the units mode is changed.
4.12. TEMPERATURE HOLD
HOLD may be used for manual temperature
control. It is the simplest means to set and
maintain a fixed temperature in Heat or Cool,
without concern for programming.
• Touching
HOLD
toggles the unit into or out of
the hold mode with the current status indicated in
the display. In HOLD adjust temperature as
desired.
• Temperature settings will only change manually
while HOLD is active. To clear hold, touch
HOLD
again.
5. PROGRAMMING
The PSP711TS provides four independent
programming periods per day. Heat and Cool are
programmed separately. You can use the default
programs or alter them to suit your schedule.
5.1. DEFAULT ENERGY STAR
®
TEMPERATURE
PROGRAMS
To review the programs select Heat or Cool mode,
touch
MENU
and then use
SCROLL
to see HEAT
or COOL PROGRAM. Touch
YES
to enter HEAT or
COOL PROGRAM. Use
NEXT
to step through each
period and its set temperature. You can use the
built-in programs as shown, or change them as
you wish. Touch
EXIT
to return to the main display.
Each day is divided into four periods. Each period
has its own starting time and temperature.
The default programs are given in the following
table:
Pressing the
S. RESET
button restores these
heating and cooling programs and all other default
settings.
5.2. PROGRAMMING THE UNIT
You can change any preset times and/or
temperatures to suit your schedules for HEAT and
COOL during each period of each day of the week.
A blank programming chart is provided for you to
record your temperature settings in that chart
(See PAGE 12).
5
Morning
Day
Evening
Night
6:00 AM 70
0
F (21
0
C)
8:00 AM 62
0
F (17
0
C)
6:00 PM 70
0
F (21
0
C)
10:00 PM 62
0
F (17
0
C)
6:00 AM 78
0
F (26
0
C)
8:00 AM 85
0
F (29
0
C)
6:00 PM 78
0
F (26
0
C)
10:00 PM 82
0
F (28
0
C)
PERIOD HEAT MODE COOL MODE