


INSTALL BATTERIES INTO THERMOSTAT: Install two brand new Energizer
®
or
DURACELL
®
“AA” size alkaline (only) batteries, into the thermostat’s battery
compartment. Ensure the batteries are installed in the proper direction.
These items below are all located behind the door on the front of the thermostat.
To open the door, pull outwards using the small indentation in the center of the
top edge of the thermostat housing.
HEAT / OFF / COOL, SYSTEM MODE SWITCH: Set this switch to HEAT to control
your heating system, and COOL to control your cooling system. The OFF position
will disable both the heating and cooling units.
AUTO / ON, FAN MODE SWITCH: When this switch is in AUTO, the blower fan (if
present in your system) will automatically cycle on and off by itself while heating
or cooling is running. When in the ON position, the blower fan will run constantly
with or without a demand for heating or cooling, even when the System Mode
switch is in the OFF position.
NOTE: The Fan Mode switch only works if your system provides a wire for the
thermostat’s “G” wire terminal, to control a blower fan. The Fan Mode switch
has no effect in systems that do not have a blower fan (such as a hot water
radiator system).
MULTI-FUNCTION, SET SLIDE SWITCH: This switch provides an easy way to
quickly access the most commonly used thermostat settings. This switch has 5
individual positions, and unless a specific setting is being adjusted, this switch
should always remain in the RUN position for the thermostat to control the room
temperature. The other Set Slide switch positions are described in greater detail
in the ADVANCED FEATURES section. NOTE: this switch is only operable when the
thermostat is in “Programmable” mode. When the thermostat is used in
“Manual” control mode, all 5 of the switch positions will act like the RUN
position, except the “FILT/ENRGY” position.
SETBACK BUTTON: This button activates and deactivates the SETBACK feature,
which overrides the set temperature for an adjustable duration. This feature is
described in greater detail in the ADVANCED FEATURES section.
17
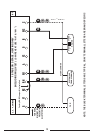
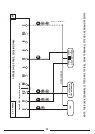
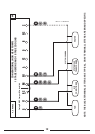
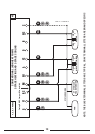
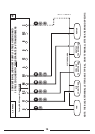
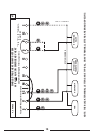
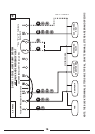
COMPLETE THE INSTALL:
FRONT PANEL ITEMS: