


Page 4
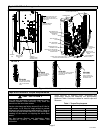
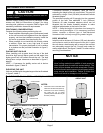
Operating Gauge Set and Service Valves
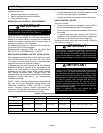
IMPORTANT
To prevent stripping of the various caps used, the
appropriately sized wrench should be used and fitted
snugly over the cap before tightening.
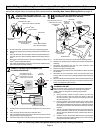
OPERATING SERVICE VALVES
The liquid and vapor line service valves are used for
refrigerant recovery, flushing, leak testing, evacuating,
weighing in refrigerant and optimizing system charge.
Each valve is equipped with a service port which has a
factory−installed valve core. Figure 2 provides information
on how to access and operate both angle− and ball−type
service valves.
USING MANIFOLD GAUGE SET
When checking the system charge, only use a manifold
gauge set that features low−loss anti−blow back fittings.
Manifold gauge set used for HFC−410A refrigerant
systems must be capable of handling the higher system
operating pressures. The manifold gauges should be rated
for:
S High side Ċ Pressure range of 0 − 800 pound−force per
square inch gauge (psig)
S Low side Ċ Use with 30" vacuum to 250 psig with
dampened speed to 500 psig
S Manifold gauge set hoses must be rated for use to 800
psig of pressure with a 4000 psig burst rating.
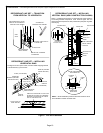
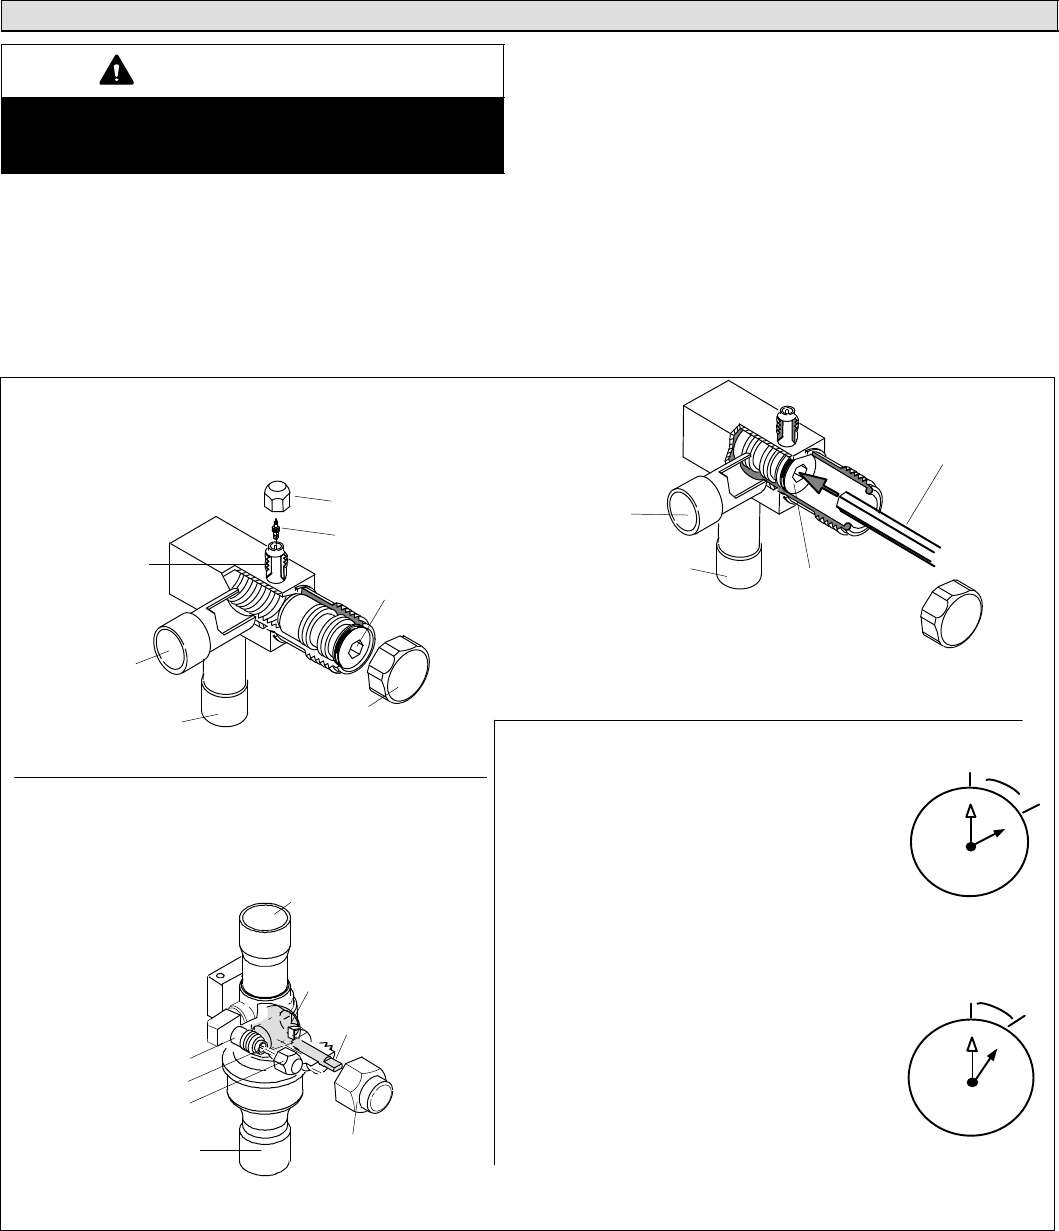
INSERT HEX−HEAD
EXTENSION HERE
SERVICE PORT CORE
SERVICE PORT CAP
SERVICE PORT
CORE
TO OUTDOOR UNIT
STEM CAP
(VALVE STEM SHOWN OPEN)
INSERT HEX WRENCH HERE
TO INDOOR
UNIT
BALL (SHOWN CLOSED)
SERVICE PORT CORE
TO INDOOR UNIT
TO OUTDOOR UNIT
ATo open rotate stem
counterclockwise
90°.
BTo close rotate stem
clockwise 90°.
SERVICE PORT
SERVICE PORT CAP
REMOVE
STEM CAP
VALVE STEM
Operating Angle−Type Service Valve:
1. Remove stem cap with an appropriately sized wrench.
2. Use a service wrench with a hex−head extension (3/16" for liquid line valve sizes and 5/16"
for vapor line valve sizes) to back the stem out counterclockwise as far as it will go to open
the service valve.
Operating Ball−Type Service Valve:
1. Remove stem cap with an appropriately sized wrench.
2. Use an appropriately sized wrenched to open.
1
2
3
4
5
6
7
8
9
10
11
12
1/12 TURN
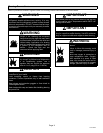
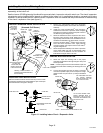
To Access Service Port:
A service port cap protects the service port core from
contamination and serves as the primary leak seal.
1. Remove service port cap with an appropriately sized
wrench.
2. Connect gauge set to service port.
3. When testing is completed, replace service port cap and
tighten as follows:
S With torque wrench: Finger tighten and torque cap per table 1.
S Without torque wrench: Finger tighten and use an appropriately sized
wrench to turn an additional 1/6 turn clockwise.
1
2
3
4
5
6
7
8
9
10
11
12
1/6 TURN
When service valve stem is in the CLOSED position,
the service port is open to the line set and indoor unit.
When service valve is OPEN, the service port is open to line set,
indoor and outdoor unit.
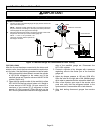
Reinstall Stem Cap:
Stem cap protects the valve stem from damage and
serves as the primary seal. Replace the stem cap and
tighten as follows:
S With Torque Wrench: Finger tighten and then
torque cap per table 1.
S Without Torque Wrench: Finger tighten and use an
appropriately sized wrench to turn an additional 1/12 turn clockwise.
NOTE Ċ A label with specific torque requirements may be affixed to the stem cap. If the label is present, use the specified torque.
TO INDOOR
UNIT
TO OUTDOOR
UNIT
REMOVE
STEM CAP
1
2
VALVE STEM
SHOWN
CLOSED
1
2
Figure 2. Angle and Ball−Type Service Valves