


NOTE: DIAGRAMS & ILLUSTRATIONS ARE NOT TO SCALE.
17
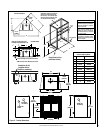
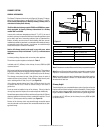
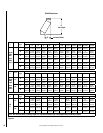
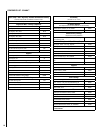
Roof Down Slope Hole Size
SLOPE ASHT+ S-2100+ AC
Roof
Pitch
8" 8" 8"
0 * 14-3/8" (365mm) 16" (406mm) 15" (380mm)
2/12 14-5/8" (371mm) 16-1/4" (413mm) 15-3/8" (390mm)
4/12 15-1/4" (387mm) 16-7/8" (429mm) 16-1/8" (410mm)
6/12 16-1/8" (410mm) 17-7/8" (454mm) 16-7/8" (430mm)
8/12 17-3/8" (441mm) 19-1/4" (489mm) 18-1/4" (465mm)
10/12 18-3/4" (476mm) 20-7/8" (530mm) 19-5/8" (500mm)
12/12 20-3/8" (518mm) 22-5/8" (575mm) 21-3/8" (545mm)
* Cross slope hole size
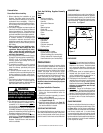
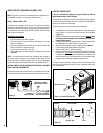
Put the chimney cap into place.
Wash the roof flashing with a solvent or vinegar, then paint it with rust-proof paint.
Table 4
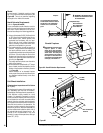
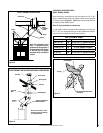
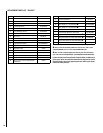
Figure 22
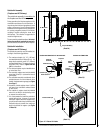
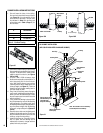
Figure 23
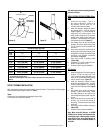
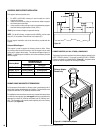
Figure 31
AC
Air Cooled Chimney
Collar
Chimney
Flashing
Spacer (built
into flashing)
OFFSET CHIMNEY INSTALLATION
After reaching the location requiring the elbow, proceed as follows. The minimum chimney height
excluding the fireplace height is shown in Table 2.
Notes:
• Must return to vertical before penetrating ceiling or floor.
• A maximum of 2 offsets are allowed.
After reaching the location requiring the elbow,
proceed as follows:
ASHT+/HT6103+/S2100+/HT6000+ Chim-
neys
1. Install the first elbow. Turn it in
the required direction. Fasten it to
the chimney with the three (3) 1/2"
(12mm) metal screws provided.
2. Install the necessary lengths to achieve
the required offset. Lock the chimney
lengths together: it is recommended to
use three (3) 1/2" (12mm) screws. If the
offset length is made of two (2) chimney
lengths use an offset support halfway up
the offset. If penetrating a wall, install a
wall radiation shield (see Figure 27).
3. Use another elbow to turn the chimney
vertically. Secure the elbow, using three
(3) 1/2" (12mm) screws (provided with
the elbow).
4. Use a plumb-bob to line up the center of
the hole. Cut a hole for the chimney in the
ceiling/floor. Frame this hole as described
previously (see Chimney Installation
Instructions on Page 16).
5. From below, install a radiation shield
(Figure 20A).
6. A support (ST+ or SO+) must be used on
the first 15 feet section (5 m).
7. Continue with the regular installation.
AC chimney
1. Install the first elbow. Turn it in the required
direction. To lock it in place, turn 1/8 of
a turn. Fasten the straps attached to the
elbow to the surrounding framing using
nails or drywall screws (Figure 25).
2. Install the necessary chimney lengths
to achieve the required offset. Lock the
chimney lengths together. If penetrating
a wall, use a wall radiation shield (Figure
27).
3. Use another elbow to turn the chimney
vertically. Lock it to the chimney. Fasten
the straps attached to the elbow to the
surrounding framing using nails or drywall
screws.
4. Use a plumb-bob to line up the center of
the hole. Cut a hole for the chimney in
the ceiling. Frame this hole as described
previously.
5. From below, install a radiation shield (see
Figure 20B).
6. Continue with the regular installation.
Note: When using AC chimney, an AC8SB
(H3801) starter section must be used before
installing an elbow. When an offset is needed
immediately off the top of the fireplace, an
elbow starter section, AC8SB30 (H3802) is
available.