


24
NOTE: DIAGRAMS & ILLUSTRATIONS ARE NOT TO SCALE.
Figure 24
Figure 25
Figure 26
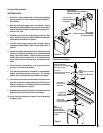
Log Installation Instructions
If logs are not installed according to the log installation instructions,
flame impingement and improper combustion could occur and result
in soot and/or excessive production of carbon monoxide (CO), a color-
less, odorless, toxic gas.
The size and position of the log set is critical to achieve a safe, reli-
able and attractive flame pattern. Any attempt to use a different log
set in the fireplace will void the warranty and will result in incomplete
combustion, sooting and poor flame quality.
Parts list: rear log, left front log, right front log, left top log, right top
log and small straight twig
1. Remove the logs from the box and carefully unwrap them. The logs
are fragile so handle them with care.
2. Align the holes in the bottom of the rear log (the longest log in the set)
with the two pegs just to the rear of the rear burner tube and slide the
log down onto the pegs. The charred black surface should face the
front.
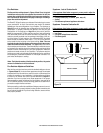
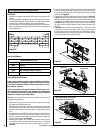
3. Rotate the right front log (3018 is cast into its bottom surface) so the
charred black surface is toward the front. Place this log so the two
holes in its bottom surface slide onto the two pegs on the right side
of the air control panel. See Figure 24.
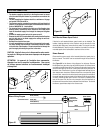
4. Rotate the left front log (3017 is cast into its bottom surface) so the
charred black surface is toward the front and place it on the pegs
protruding from the left side of the air control panel as shown in
Figure 25.
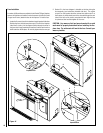
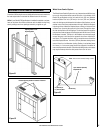
Brick Panel
1. Remove the wrapping around brick panels which are shipped in the
firebox.
2. The long rectangular panel goes in the rear of the firebox - he thin layer
of bricks should be down. The panel rests on 3 metal tabs protruding
from the rear of the firebox about 3” above the firebox floor.
3. On the side panels, the rounded edge goes to the front. Install the side
panels by sliding them along the side of the firebox into retainers at
the top and bottom.
Figure 23
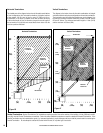
5. The small straight top twig (3021) should be turned so the black flat
end is turned toward the rear. Slide the holes in the bottom of this
twig over the right peg on the left front log and the hole on the right
front log. See Figure 25.
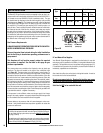
6. The left top log (3019) should be positioned as shown in Figures 25
and 26. Slide the holes in the bottom of this log over the hole in the
left end of the rear log and the peg in the left end of the left front log.
The right top log (3020) should be positioned as shown in Figures
25 and 26. Slide the holes in the bottom of this log over the peg in
the right end of the right front log and rest it on the flat spot on the
rear log.
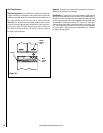
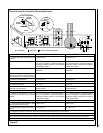
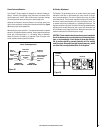
7. Figure 26 shows the entire log set assembled. The volcanic stone
provided may be placed one high in front of the front burner tube
using care not to cover all the burner ports. Any extra embers may be
placed at the ends of the front log - off the burner. Place small pinches
of embers (rockwool) on top of the embers.
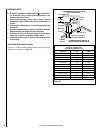
BRICK PANEL AND LOG SET INSTALLATION
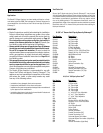
Firebox Accessories / Parts
Cat. No. Description
H5862 Log Set
H5863 Bag of Embers (volcanic stone)
H5864 Bag of Glowing Embers (rockwool)
H5865 Bag of Steel Wool
Log Set and Embers
Flat
Area
Left Top Log
Right Top Log
Hole to
Cover
Hole to
Cover
Note: The pilot flame can be viewed
through this hole in the front log.
Embers