icomfort Wi−Fit 7−Day Programmable Communicating Thermostat
Page 17
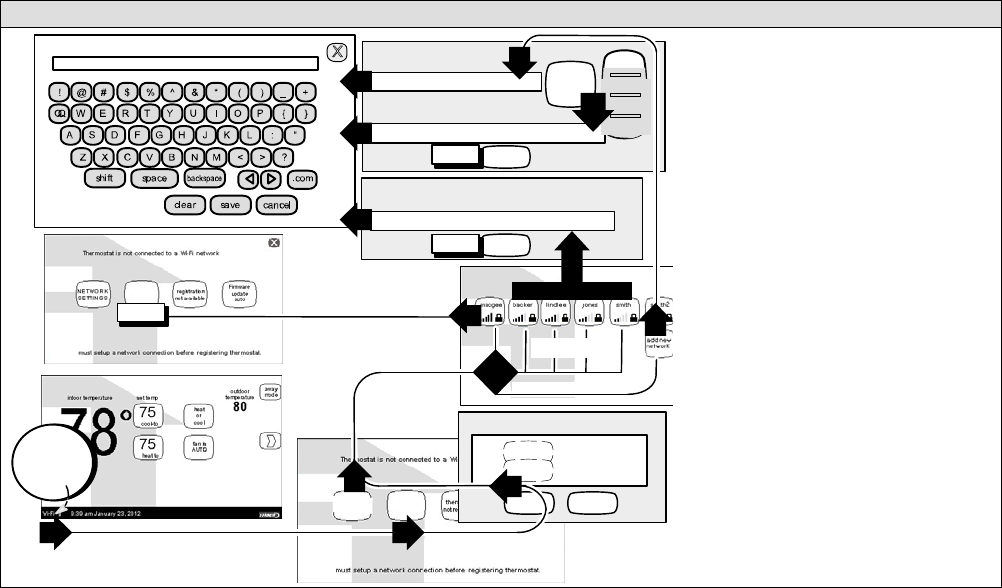
Enabling the thermostat’s Wi-Fi feature from the Home screen
press any line to edit it
connect
password
security
is WPA2
network name (SSID)
type the network security key or passphrase for
(locked Wi−Fi Access Point [AP])
network security key or passphrase
press here to enter network name
press here to enter Wi−Fi AP (router) password
displays information here as keys pressed
User Agreement
accept decline
connect
press here to enter Wi−Fi AP (router) password
next...
next...
5.2 CREATE NEW AP
1
START
HERE
WI−FI SETTINGS
WI−FI SETTINGS
NETWORKSETTINGS
Wi−Fi
enable
NETWORK
SETTINGS
Wi−Fi
disable
none
WEP
WPA
WPA2
WEP
WPA
WPA2
Secure Connection Recommended!
Make sure the router is capable of, and set to operate
in wireless network b" mode. Check router utility
program or contact service provider for help. A se-
cure wireless network is recommended over an open
(unsecured) network. You will need the homeowner’s
approval and router password to enable Wi−Fi in a se-
cured connection.
Enable Wi−FiĊTo enable the Wi−Fi feature to
communicate with a wireless router:
1. Press and release Wi−Fi" in the lower left corner of the
HOME screen (see START HERE). The screen
changes from the Home Screen to the WI−FI SET-
TINGS screen.
2. Press the Wi−Fi enable button.
3. Press next as necessary; then press accept after
reading the User Agreement.
4. Press NETWORK SETTINGS; this screen shows a
graphical view of buttons representing Wi−Fi options
OPEN and SECURE wireless networks and a button
for creating a new access point (AP).
5. Decide which of these buttons you need to select:
5.0ĊOPEN Wi−Fi Port (no password required).
5.1ĊSECURE Ports (requires router password).
5.2ĊCreate new AP (Access Point).
5.2aĊWhen creating a new AP, you have the option
of selecting a security level (default is none; choose
from WEP, WPA, WPA2, depending on the security
defined in the homeowner’s router); the password field
appears.
6. When you touch in one of the input fields (press here
to enter...), the keyboard tool appears. Enter password
(if simply logging into an existing network) or enter the
network name if creating a new AP. If you mistype the
password or if you cannot access the selected net-
work, a message will alert you to retry.
7. Press connect to complete the connection. Note that
Wi−Fi enable" button on the Wi−Fi SETTINGS screen
changes to Wi−Fi disable".
7 END
7 END
7 END
5.0 UNSECU-
RED ACCESS
POINT
5.1 SECURE
Access Points
6
2
4
5.2
5.2
5.1
3
1
6
6
5.2
a
5?
5.0
Wi−Fi
Figure 22. Wi−Fi setup


