


9
II. INDOOR TEMPERATURE, HUMIDITY, AND COMFORT LEVEL INDICATOR
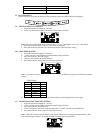
The current indoor temperature and relative humidity are displayed in the INDOOR LCD.
The comfort level indicator is located at the center of the INDOOR LCD. The indicator will display a happy face icon
when the temperature is between 68°F and 78.6°F, and the humidity is between 45% and 65%. A sad face icon will be
displayed when the temperature and humidity are outside the mentioned ranges.
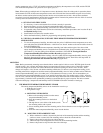
III. OUTDOOR TEMPERATURE AND HUMIDITY / HEAT INDEX / DEWPOINT
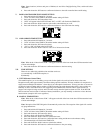
The temperature and humidity received from the remote temperature/humidity sensor is viewed in the OUTDOOR LCD.
When there is more than one remote temperature/humidity sensor unit in operation, a “boxed” number will appear to the
center of the temperature. This indicates which remote temperature sensor unit (1, 2, or 3) is currently displaying its data
in the OUTDOOR LCD. (This feature is explained in further detail in section VII—Adding Remote Temperature
Sensors). The Heat Index and Dew Point will then be calculated from the received temperature/humidity readings.
IV. MINIMUM AND MAXIMUM TEMPERATURE, HEAT INDEX AND DEW POINT RECORDS
The WS-9043U keeps a record of the MINIMUM and MAXIMUM and date of their occurrence, for both the indoor and
outdoor modes.
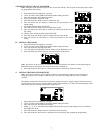
A. VIEWING THE INDOOR TEMPERATURE AND HUMIDITY RECORDS
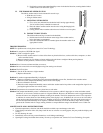
1. Press and release the IN/HR button once. “MAX” temperature appears with the indoor temperature,
indicating that the maximum temperature and the time and date of occurrence are displayed. The maximum
record will display for 30 seconds before returning to the normal display mode.
2. Press and release the IN/HR button again (once while “MAX” temperature is still displayed, twice
otherwise). “MIN” appears with the indoor temperature, indicating that the minimum temperature and the
time and date of occurrence are displayed. The minimum record will display for 30 seconds before
returning to the normal display mode.
3. Press and release the IN/HR button again (once while “MIN” temperature is still displayed, 3 times
otherwise). “MAX” appears with the indoor humidity, indicating that the maximum humidity and the time
and date of occurrence are displayed. The maximum record will display for 30 seconds before returning to
the normal display mode.
4. Press and release the IN/HR button again (once while “MAX” humidity is still displayed, 4 times
otherwise). “MIN” appears with the indoor humidity, indicating that the minimum temperature and the time
and date of occurrence are displayed. The minimum record will display for 30 seconds before returning to
the normal display mode.
5. While “MIN” is still displayed press and release the IN/HR button again to return to the current data
display. While in the record display mode, pressing any key except SET key will also return the display
back to the current readings.
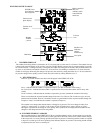
B. VIEWING THE OUTDOOR TEMPERATURE/ HUMIDITY/ HEAT INDEX AND DEW POINT
RECORDS
1. Press and release the OUT/MIN button once. “MAX” appears with the outdoor temperature, indicating that
the maximum temperature, and the time and date of occurrence are displayed. The maximum record will
display for 30 seconds before returning to the normal display mode.
2. Press and release the OUT/MIN button again (once while “MAX” temperature is still displayed, twice
otherwise). “MIN” appears with the outdoor temperature, indicating that the minimum temperature and the
time and date of occurrence are displayed. The minimum record will display for 30 seconds before
returning to the normal display mode
3. Press and release the OUT/MIN button again (once while “MIN” temperature is still displayed, 3 times
otherwise). “MAX” appears with the outdoor humidity, indicating that the maximum humidity, and the time
and date of occurrence are displayed. The maximum record will display for 30 seconds before returning to
the normal display mode.
4. Press and release the OUT/MIN button again (once while “MAX” humidity is still displayed, 4 times
otherwise). “MIN” appears with the outdoor humidity, indicating that the minimum humidity and the time
and date of occurrence are displayed. The minimum record will display for 30 seconds before returning to
the normal display mode.
5. Press and release the OUT/MIN button again (once while “MIN” humidity is still displayed, 5 times
otherwise). “MAX” appears with the heat index and, indicating that the maximum heat index, and the time
and date of occurrence are displayed. The maximum record will display for 30 seconds before returning to
the normal display mode.
6. Press and release the OUT/MIN button again (once while “MAX” heat index is still displayed, 6 times
otherwise). “MIN” appears with the heat index, indicating that the minimum heat index and the time and
date of occurrence are displayed. The minimum record will display for 30 seconds before returning to the
normal display mode.
7. Press and release the OUT/MIN button again (once while “MIN” heat index is still displayed, 7 times
otherwise). “MAX” appears with the dew point, indicating that the maximum dew point, and the time and