


4
• If a button is pressed before the indoor weather station receives the signal from the remote temperature/humidity sensor, you
will need to follow the battery installation procedure again.
To complete the set up of your new wireless weather station after the 15 minutes have passed please follow the steps that follow in
the Detailed Set-Up Guide.
DETAILED SET-UP GUIDE
BATTERY INSTALLATION
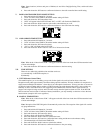
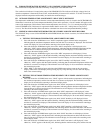
A. REMOTE TEMPERATURE/HUMIDITY SENSOR
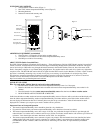
1. Remove the mounting bracket and Rain cover.
2. Remove the battery cover by sliding the cover down.
3. Observing the correct polarity install 2 AA batteries. The batteries will fit tightly (to avoid start-up problems
make sure they do not spring free).
4. Replace the battery cover by sliding upwards. Be sure battery cover is on securely.
5. Replace the humidity hood.
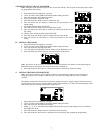
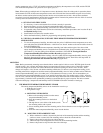
B. INDOOR WEATHER STATION
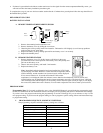
1. Remove the battery cover. To do this, insert a solid object in the space
provided at the lower-central position of the battery cover, then push up and
pull out on the battery cover.
2. Observe the correct polarity, and install 3 AA batteries.
3. Replace the battery cover.
Note: Immediately after the batteries have been installed, the LCD (Liquid
Crystal Display) will flash. Within 15 seconds the indoor temperature, indoor
relative humidity, and the weather icons (sun and clouds) will be displayed.
If not, remove batteries for 10 seconds and reinstall. If the outdoor
temperature is not displayed within four minutes, remove batteries from both units, wait 30 seconds, and
reinstall making sure to install batteries into the remote temperature sensor first. The time will show 12:00 and
start searching for the WWVB signal. If it successfully receives the time signal (usually at night), it will display
the correct time (default time-zone is Eastern). You will need to adjust the time zone to match your local time.
PROGRAM MODE
Programming Note: If 15 seconds are allowed to pass, or the SNOOZE/CH button is pressed during the programming mode,
the unit will confirm/set the last information entered—the display will stop flashing and return to normal time-date readings.
If you don’t leave the program mode during the programming of sections IV through XI, you can advance to step 4 of the
next program setting. If you do leave the program setting (or want to program a specific setting) follow each instructional step
to program that setting.
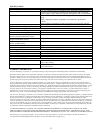
I. PROGRAMMING SEQUENCE AND DEFAULT SETTINGS
The programming sequence and default (factory) settings are as follows:
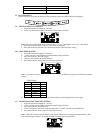
LCD Contrast 5
Time Zone -5 (Eastern)
Daylight Saving Time ON
Radio-controlled time reception ON
12/24-hour time 12
Time – Hour 12
Time – Minute :00
Year 2003
Month 1
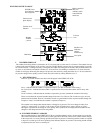
Battery
Cover
Mounting
Bracket
Rain
Cover
Thermo-Hygro
Transmitter