


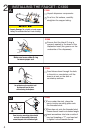

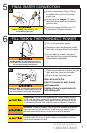

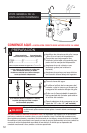

Mount tank vertically in an area that
allows clearance on the underside of the
tank for drainage, if necessary.
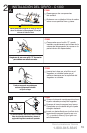
DO NOT over tighten screws.
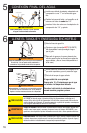
■■ Pre-drill 1/8" pilot holes at marks.
■■ Turn screws into pre-drilled holes,
leaving 1/4" exposed.
■■ Hang the tank on the screws.
■■ Tighten the screws with only 1/2 turn
clockwise.
B
A
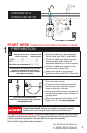
■■ Select a spot under the sink to mount
tank vertically within reach of both
plumbing and electrical connections.
The tank should be within 16" or less
of faucet water lines and within 30"
or less of a standard grounded outlet.
■■ While holding tank in place on
the spot selected for installation,
use a pencil to mark locations for
2 hanging screws.
Property Damage: Tank must be located within 16" of
faucet and within 30" or less of a standard grounded
outlet. DO NOT extend plumbing or electrical lines.
3
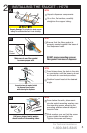
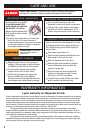
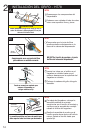
■■ Without depressing the gray button,
place the snap-connect fitting at
the end of the blue 1/4" tube onto
the left plastic fitting on the tank,
pushing until it clicks into place. (1)
■■ Slip the flexible white 7/16" tube
over barbed middle fitting and slide
down approximately 1/2". (2)
4
1
2
A
Property Damage: Pinched or blocked water lines
may cause damage to the dispenser tank.
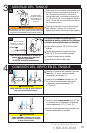
■■ Slip the clear 5/16" tube over the
far right smooth fitting and slide
down approximately 1/2". (3)
■■ Visually check for pinched or
crimped tubes.
B
3
Property Damage: Check to make sure
tubes are connected properly and are
pushed in as far as possible.
Screws provided are for use in wood
studs or cabinets only. Use wall anchors
(not supplied) for installation into drywall.
Leave 1/4" for
hanging tank.
CONNECTING FAUCET TO TANK
MOUNTING THE TANK
Tank must be
mounted level
to ensure
proper operation.
6