


Page 6
7.0 GETTING STARTED:
This assumes you have just received the instrument and it is NOT powered up.
1 Plug in the sensor and connect the handgun to the console. Align the red marks
and press home.
2 Connect to a mains electrical supply AC 85-265V.
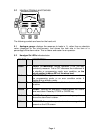
An opening screen is now displayed which identifies the major components of the
instrument. You will hear the vacuum system initialising and a valve operation. This is
setting the required vacuum level. Approx. 20-30 seconds later, the instrument will enter
SEARCH MODE. High sensitivity leak searching can now begin.
You may find the display difficult to read due to different light levels. Tap the screen with
your finger, this will change to a menu. Touch Set Volume/Contrast you will now be
given a menu, move to Display Contrast (coarse) and press the ♦ move this to change
contrast. When the screen is right for you, press Exit.
Should this not be the case, please refer to paragraphs "Possible Fault Conditions
During Operation" and "Switching Off in Case of Fault" in this manual.
7.1 MEASURING OPERATION:
The GAS CHECK is ready to measure whenever the big digit leak rate display is visible
on the console screen 000 this will only happen while:
Sensor is working within operational limits.
Sample flow is correctly within tolerance.
All self-diagnostic checks are successful.
The green LED "READY" on the handgun will be on as long as the reading is below 20%
of the alarm value. Clear the reading by pressing the CIRCLE key.
7.2 POSSIBLE FAULT CONDITIONS DURING OPERATION
In case of a relevant fault condition, the status indication lights will change from "READY"
to "NOT READY" plus "MESSAGE". The operator should now read (and confirm) the
error message on the screen. The following fault conditions may occur:
Pressing the ZERO button before and after critical leak testing will zero the
instrument to ambient conditions and compensate for background levels of SF6 in
the air.