


4
41797-01 • 07/06/10 • Hunter Fan Company
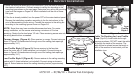
3 • Setting Jumpers & DIP Switches
BEFORE INSTALLING THE CONTROL:
1. Use the pull chain switch to set the fan speed to the HIGH position before installation.
Do not use the pull chain to change the fan speed after installation, as damage to
your ceiling fan or universal control may result. The speed of the fan should only be
changed by the Hunter control.
2. Set the ceiling fan light kit to the ON position before installation. The light level should
only be changed by the Hunter control.
Installation Instructions:
1. Disconnect power to the ceiling fan and light kit at the main electrical panel. Remove fuse or move circuit breaker
to the OFF position.
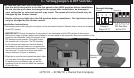
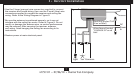
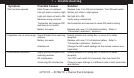
2. IMPORTANT! Change the position of the jumpers in the transmitter and the DIP switches in the receiver.
Before you change a jumper, make sure the battery is not connected to the transmitter. Be sure the position of the
jumpers in the transmitter match the position of the
DIP switches on the receiver. If they don’t match,
the controller will not function. The DIP switches
for the receiver are located on the at surface of
the receiver. In the transmitter you can access the
jumpers from the battery compartment. The jumpers
are very small. You can move them most easily
using a small pair of pliers or tweezers.
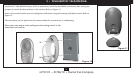
3. When two or more fans are located near each other,
you may want to have the receiver/transmitter
for each fan set to a different code, so that the
operation of one fan does not affect the operation
of the other fans.
Receiver
Example Settings
Figure 1
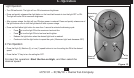
Transmitter
Jumnpers
Figure 2
Receiver DIP
Switches
Figure 3
Jumpers
Set to 0111
Transmitter
DIP Switches
Set to 0111
1234
1
2
3
4