


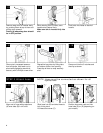
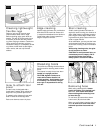

How to replace
Disconnect cleaner from electrical
outlet.
Remove bottom plate, belt and agitator
following directions in “The belt” section
beginning with Fig. 3-10.
Discard old agitator.
Continue following the directions in “The
belt” section to reposition belt, new agi-
tator and bottom plate.
11
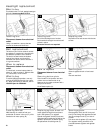
Replacing bottom plate
Reposition bottom plate and 4 Phillips
head screws. Tighten screws securely.
3 - 1 6
Continued
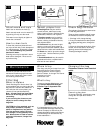
The agitator brush ro l l
The edge gro o m e r s
When to replace
The edge groomers, located on both
sides of the nozzle, should be replaced
when they no longer extend past the
surface of the bottom plate.
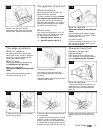
What to buy
When purchasing edge groomers, ask
for HOOVER part No. 39511004.
How to replace
Disconnect cleaner from electrical
outlet.
Remove bottom plate as described in
“The belt” section (Fig. 3-10).
Installing groomers
Lift off both old edge groomers and
slide new edge groomers into position
as shown.
Reposition bottom plate and secure with
4 Phillips head screws.
3 - 1 7
3 - 1 8
3 - 1 5
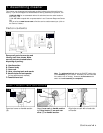
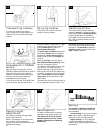
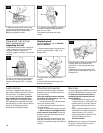
When to replace
When agitator brushes are worn, the
agitator should be replaced.
To check condition of brushes, discon-
nect cleaner from electrical outlet.
Move edge of a card across bottom
plate while turning agitator. To maintain
cleaning effectiveness, replace agitator
if brushes do not touch card.
What to buy
Your cleaner requires either a 13” or 15”
agitator. When purchasing a new agita-
tor, ask for one of the following:
13” - HOOVER part No. 48414110
15” - HOOVER part No. 48414115
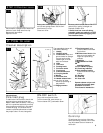
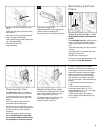
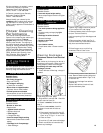
P o w e r ed hand tool
Agitator brush roll
replacement
When agitator brush roll brushes are
worn, the brush roll should be replaced.
Ask for HOOVER part No. 48414088.
A
B
E
C
D
C
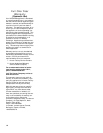
How to replace
1. Remove tool from hose and turn it so
bottom faces up. Press the latches on
either side of tool and remove bottom
plate (A).
2. Unscrew the two Phillips screws and
remove belt guard (B).
3. Remove agitator including end plates
(C) and discard.
4. Inspect belt to ensure that it is in good
condition. If belt is cracked, gouged or
broken, replace it (see following section).
5. Insert brush roll through belt and posi-
tion belt over gear teeth (D) on brush roll.
6. With curved ends down, slide end
plates (C) of brush roll into slots (E) on
tool.
3 - 1 9
3 - 2 0
3 - 2 1