


3
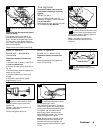
F
H
F
H
K
J
5
4
I
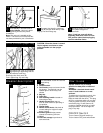
With arrow (H) on (F) pointing
toward arrow (H) on (I), press groove
(J) into slot (K).
Pull cord tight.
Rotate cord protector (F) on cord
until you see its arrow (H).
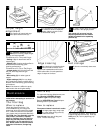
4
5
I
F
6
F
Press cord into place at each of the
three notches indicated and note
correct positioning of (F).
Do not plug cleaner in until assembly
is totally complete.
6
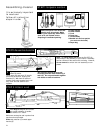
STEP 4 Attach cloth
outer bag
7
A
C
B
7
Note location of tapered rails (A) on
back of outer bag base (B) and on
front of lower handle (C).
8
B
A
C
D
Slide rails on (B) onto rails on (C)
until (B) snaps past the lock tab (D).
8
9
D
E
B
9
The hole (E) in handle is visible
through U-shaped extension on (B)
when (B) is in position past (D).
Be sure that power cord is pulled tight
and pressed into each of the three
notches (Fig. 6) before completing the
following steps.
10
G
F
H
Note round opening (F) and hooks
(G) on back of outer bag (H).
Place opening over dirt tube (I).
Unzip (H) and place hand inside. Press
down firmly to snap hooks into handle.
10
STEP 5 Attach handle
11
With outer bag to the front, place
assembled handle onto handle base
of cleaner body.
Rock handle side to side while pushing
down firmly. Extra pushing effort may
be required.
Press the handle release lever to move
handle to the operating or middle
position.
Push bolt into hole on lower front of
handle.
If bolt will not go through hole easily
handle is not pushed completely down.
11
12
Continued ➜
12
I