


T7351 COMMERCIAL PROGRAMMABLE THERMOSTAT
63-2666—02 6
a
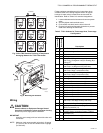
Factory jumper between RC and RH for systems with one
transformer.
b
For changeover functional details, see Operation section.
c
HC connection is not needed when using a TR23-H sensor.
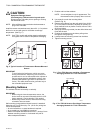
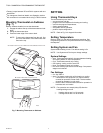
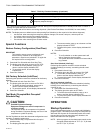
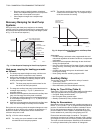
Mounting Thermostat on Subbase
(Fig. 7)
With the subbase installed, mount the thermostat:
1. Engage the tabs at the top of the thermostat and sub-
base.
2. Swing the thermostat down.
3. Press the lower edge of the case to latch.
NOTE: To remove the thermostat from the wall, first
pull out at the bottom of the thermostat; then
remove the top.
Fig. 7. Mounting Thermostat on Subbase.
SETTING
Using Thermostat Keys
The thermostat keys are used to:
• set current time and day,
• program times and setpoints for heating and cooling,
• override the program temperatures,
• display present setting,
• set system and fan operation,
• perform simple configuration.
NOTE: Refer to Fig. 8 for keypad information.
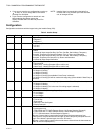
Setting Temperature
Refer to Table 2 for the default temperature setpoints. See
Programming section for complete instructions on changing
the setpoints.
Setting System and Fan
System default setting is Auto. Fan default setting is On.
NOTE: Use System and Fan keys to change settings.
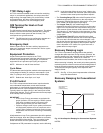
System Settings
— Auto: Thermostat automatically changes between heating
and cooling based on indoor temperature.
— Cool: Thermostat controls only cooling.
— Off: Heating, cooling, and fan are all off.
— Heat: Thermostat controls only heating.
— Em Heat: Auxiliary heat serves as first stage. Compressor
stages are locked off.
Fan Settings.
— On: See Table 4.
— Auto: Fan always cycles with call for heating or cooling.
— Conventional: The equipment (i.e. plenum switch)
controls fan operation in heat mode. The thermostat
controls fan operation in cool mode.
— Electric Heat: The thermostat controls fan operation in
both heat and cool modes.
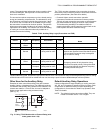
NOTE: Fan operation can extend (delay Off) after the
heating/cooling turns off:
— Heating choices are 0 or 90 seconds.
— Cooling choices are 0 or 40 seconds.
M19609
B. PRESS LOWER EDGE OF CASE TO LATCH.
A. ENGAGE TABS AT TOP OF THERMOSTAT AND SUBBASE OR WALLPLATE.