


Honeywell EC-P2 Instruction and Installation Manual
9
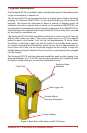
The normal operating screen displays the information as shown in Figure 2.
The Honeywell EC-P2 is designed to avoid accidental shut-off of the power. To turn
the unit off, the PWR button must be held down for approximately three seconds.
Release the button after the “Power Down” message appears.
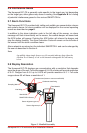
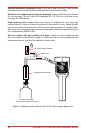
2.2 Changing the Target Gas using SMART-CELL Technology
The Honeywell EC-P2 can easily be changed to sense another target gas by
installing the SMART-CELL for the desired target gas. Each SMART-CELL contains
all the calibration and alarm setpoint information on its internal memory chip, so
recalibration or reprogramming is not necessary when changing the Honeywell
EC-P2 from one gas to another. This procedure can be performed with the unit
powered on or off (see Figure 3).
Unscrew the two stainless steel thumbscrews and remove the black inlet 1.
/ outlet manifold lid from the back of the unit.
To remove the existing SMART-CELL, grip the sides of the cell and pull 2.
it straight out.
Install the desired SMART-CELL by gently inserting it into the socket. Notice 3.
that the SMART-CELL is keyed so it cannot be inserted incorrectly.
Replace the manifold and hand tighten the thumbscrews.4.
Verify proper flow through the sampling wand using the flowmeter 5.
provided.
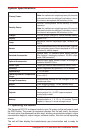
Note:
Extra SMART-CELLS should be kept on the optional sensor keeper when
not in use to keep them “warmed up” and ready for immediate use. The
sensor keeper is powered by an Alkaline “D” size battery which should
be replaced every 6 months.
For a variety of target gases, see page 19 for a list of available SMART-CELLs.
Contact Honeywell Analytics if the desired target gas is not listed, as new cells
may be available.