


5
Heat & Glo • Supreme-XTS, Grand-XTS • 349-901 Rev. i • 12/09
Heat & Glo gas inserts are designed for recessed installa-
tions into solid fuel masonry or factory built non-combustible
fi replaces that have been installed in accordance with the
National, Provincial, State and local building codes.
Prior to installing the gas insert:
• Have the chimney and adjacent structure inspected
and cleaned by qualifi ed professionals. Hearth & Home
Technologies recommends that NFI or CSIA certifi ed
professionals, or technicians under the direction of certi-
fi ed professionals, conduct a minimum of a NFPA 211
Level 2 inspection of the chimney.
• Replace component parts of the chimney and fi replace
as specifi ed by the professionals.
• Ensure all joints are properly engaged and the chimney
is properly secured.
When planning an appliance installation, it’s necessary to
determine the following information before installing:
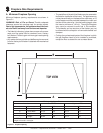
• Minimum fi replace size. See Section 3.A.
• Gas supply piping.
• Electrical wiring.
• Finishing details.
• Existing mantel, mantel legs and wall projection loca-
tions. See Section 3.C.
• Whether optional accessories—devices such as a fan,
wall switch, or remote control—are desired.
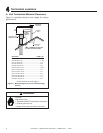
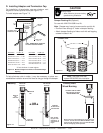
B. Tools and Supplies Needed
Before beginning the installation be sure that the following
tools and building supplies are available.
Pliers Hi temp caulking material
Hammer Flat blade screwdriver
Voltmeter Framing square
Gloves Variable speed drill
1/4 Hex drive Safety glasses
Manometer Phillips screwdriver
Tape measure Non-corrosive leak check solution
1/2 - 3/4 inch length, #6 or #8 Self-drilling screws
Check building codes prior to installation.
• Installation MUST comply with local, regional, state and
national codes and regulations.
• Consult insurance carrier, local building, fi re offi cials or
authorities having jurisdiction about restrictions, installation
inspection, and permits.
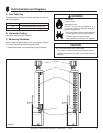
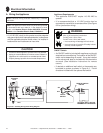
A. Design and Installation Considerations
Heat & Glo direct vent gas appliances are designed to
operate with all combustion air siphoned from outside of
the building and all exhaust gases expelled to the outside.
No additional outside air source is required.
2
2
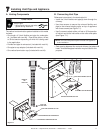
Getting Started
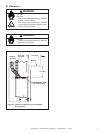
C. Inspect Appliance and Components
• Carefully remove the appliance and components from
the packaging.
• The vent system components, surrounds and fronts are
shipped in separate packages.
• The fi ber logs may be packaged separately and must
be fi eld installed.
• Report to your dealer any parts damaged in shipment,
particularly the condition of the glass.
• Read all of the instructions before starting the insta-
llation. Follow these instructions carefully during the
installation to ensure maximum safety and benefi t.
CAUTION
Keep appliance dry.
• Mold or rust may cause odors.
• Water may damage controls.
Inspect appliance and components for damage.
Damaged parts may impair safe operation.
• Do NOT install damaged components.
• Do NOT install incomplete components.
• Do NOT install substitute components.
Report damaged parts to dealer.
Hearth & Home Technologies disclaims any
responsibility for, and the warranty will be voided
by, the following actions:
• Installation and use of any damaged appliance or vent
system component.
• Modifi cation of the appliance or vent system.
• Installation other than as instructed by Hearth & Home
Technologies.
• Improper positioning of the gas logs or the glass door.
• Installation and/or use of any component part not approved
by Hearth & Home Technologies.
Any such action may cause a fi re hazard.
WARNING
WARNING
WARNING