


8 Heat & Glo Lifestyle Collection • Dakota-AU• 4036-914 Rev B • 06/07
4
4
Fireplace Preparation
Sharp Edges
• Wear protective gloves
and safety glasses during
installation.
CAUTION
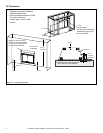
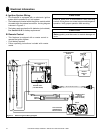
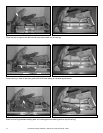
A. Remove Logs and Shipping Cover
Remove locking screw at the top of the doors (shown in Fig-
ure 4.1).
Open the doors by sliding the handles toward the outside
edges of the doors as shown in Figure 4.1. Remove the car-
tons of logs from their shipping location in the fi replace. Set
logs and door lock bracket screw aside for later reinstalla-
tion.
Open Open
Locking Screw
Figure 4.1 Door Operation
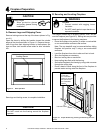
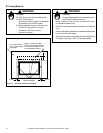
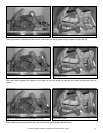
Do NOT notch into the framing around the fi replace
spacers.
CAUTION
NAILING TABS
Upper front can be
covered with
non-combustible
material or removed
and replaced with
non-combustible
material.
Figure 4.2 Proper Positioning, Leveling and Securing of a Fire-
place
B. Securing and Leveling Fireplace
The diagram shows how to properly position, level, and se-
cure the fi replace (see Figure 4.2). Nailing tabs are provided
to secure the fi replace to the framing members.
• Place the fi replace into position on either a combustible
or non-combustible continuous fl at surface.
Fire Risk
• Prevent contact with sagging, loose
insulation.
• Do NOT install against vapor barriers or
exposed insulation.
WARNING
Note: The top standoffs may be removed before sliding
fi replace into position only if using a non-combustible
enclosure.
• Level the fi replace from side to side and front to back.
• Shim the fi replace as necessary.
• Bend out nailing tabs on each side.
• Keep nailing tabs fl ush with the framing.
• Secure the fi replace to the framing by using nails or screws
through the nailing tabs.
• Place a bead of caulk along the front of the fi replace to
prevent water running under the fi replace.
Save logs and locking screw, to complete installation.