


Page 58
433-1390G
September 1, 2008
R
7100FP EPA Woodburning Fireplace
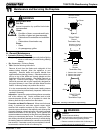
2. Disposal of Ashes
Fire Risk.
Disposal of Ashes
WARNING
• Ashes should be placed in metal container with tight
fitting lid.
• Do not place metal container on combustible surface.
• Ashes should be retained in closed container until all
cinders have thoroughly cooled.
Fire Risk.
• Do not use chimney cleaners or flame colo
-
rants in your appliance.
Will corrode pipe.
WARNING
• Frequency: As necessary
• By: Homeowner
• Task: See the following instructions.
Ashes should be placed in a metal container with a
tight fitting lid. The closed container of ashes should
be placed on a non-combustible floor or on the ground,
well away from all combustible materials, pending final
disposal. If the ashes are disposed of by burial in soil
or otherwise locally dispersed, they should be retained
in the closed container until all cinders have thoroughly
cooled.
3. Glass Cleaning
• Frequency:
As necessary
• By: Homeowner
• Task: See the following instructions.
Clean glass with a non-abrasive glass cleaner. Abrasive
cleaners may scratch and cause glass to crack. If the
deposits on the glass are not very heavy, normal glass
cleaners work well. Heavier deposits may be removed
by using a damp cloth dipped in wood ashes or by using
a commercially available oven cleaner. After using an
oven cleaner, it is advisable to remove any residue with
a glass cleaner or soap and water. Oven cleaner left on
during the next firing can permanently stain the glass
and damage the finish on plated metal surfaces.
A portion of the combustion air entering the firebox is deflected
down over the inside of the door glass. This air flow “washes”
the glass, helping to keep smoke from adhering to its surface.
When operated at a low burn rate, less air will be flowing
over the glass and the smoky, relatively cool condition of a
low fire will cause the glass to become coated. Operating
the appliance with the Burn Rate Air Control and Start-Up Air
Control all the way open for 15-20 minutes should remove
the built up coating.
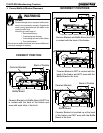
B. Glass Replacement
• Use only glass specified in manual.
• DO NOT REPLACE with any other material.
Glass breakage will occur.
WARNING
Fire Risk.
Injury Risk.
1. Ensure that the fire is out and the appliance is cool to
the touch.
2. Protect a table or counter top with padding or towels.
3. Remove door with broken glass from the appliance by
lifting door up and off of the hinges.
4. Lay door face down on a table or counter making sure
handle and handle attachment knob hang over the edge
of the table top so door lays flat, on a soft surface.
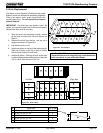
5. Remove screws from the top and bottom glass frames
(5 on each door) using a #2 Phillips Head screwdriver.
Set frames aside and retain screws.
HINT: Soak screws in penetrating oil for easy removal.
6. Remove the glass and discard.
7. Position the new glass with edges evenly overlapping
the opening in the front door.
8. Replace the glass frames. Be careful not to cross thread
the screws.
9. Start screws to secure glass frames to door, keeping
them loose for adjusting the glass. Then continue to
tighten each screw alternately, a few turns at a time,
until the glass panel is tightened snugly. DO NOT OVER-
TIGHTEN SCREWS.
10. Replace the door on the appliance.
11. After the first burn, recheck the tightness of the screws.
NOTE: REMOVE ALL LABELS FROM GLASS BEFORE
LIGHTING THE FIRST FIRE IN YOUR APPLIANCE.