


17
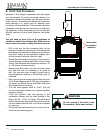
Do Not Burn Wet Coal!
Super-Magnum Coal Stoker Stove
3-90-02702R4_08/12
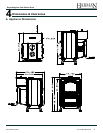
B. Leveling the Appliance
To adjust the leveling bolts, you must rst loosen
the locking nut. Turn the leveling bolt to the desired
position, and re tighten the locking nut against the cast
iron leg.
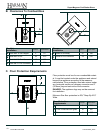
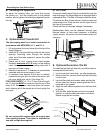
C. Optional Heat Transfer Kit
The duct piping must be of metal construction in
accordance with NFPA 90B, 2-1.1, and 2-1.3.
1. Lift and remove the round cover from the top of the
Super Magnum.
2. Install the 6" duct pipe starting collar into the round
opening. Reaching down through the starting
collar, bend the tabs upward to secure the collar
to the stove.
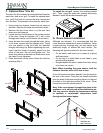
3. Attach your 6" duct, coming from a heat register
located a minimum of 17 ft. away, to the starting
collar. Secure the duct to the starting collar with a
minimum of three screws.
4. Maintain a minimum of 1" clearance to combustible
materials with the entire length of duct.
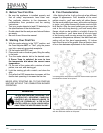
5. If maximum heat transfer to the duct is desired,
replace the air grill, from the front of the stove, with
the cover plate from the kit. (See Page 18)
FOR YOUR SAFETY- At 17 to 21 feet of duct length,
the 1/2 inch tab MUST be removed from the top of the
plate. At 21 feet or more, the cover plate can remain
solid, allowing all of the heated air to ow through the
duct pipe.
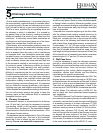
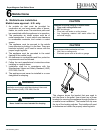
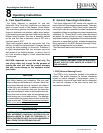
D. Air Filter
To ensure cleanliness of the air circulated through the
heat exchange, the Super Magnum is equipped with a
replaceable lter. The lter is located under the stove.
To remove the lter, loosen the two thumb screws and
remove the cover. Slide the lter out the open slots in
the front of the channel.
Check the lter for damage, change if necessary.
Replacement lters can be obtained through your
Harman dealer, or from most hardware, or building
supply centers. Be sure to turn the blower off prior to
changing
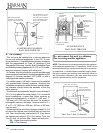
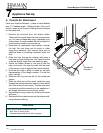
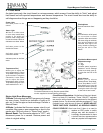
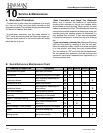
E. Optional Decorative Tile Kit
To install the optional ash door tile, you'll rst need to
unassemble the ash door.
1. Lay the ash door, face down, on a at workspace.
2. Remove the four screws which hold the ller plate
into the door.
3. Lay the ller plate and screws aside, and lay the
tile into place on the door assuring that the tile is
centered on the gasket.
4. Apply the self adhesive gasket onto the back side
of the tile.
5. With the ller plate ipped over from its original
position, it now becomes the backer for the tile.
Attach using the four screws.
Break-away tab for duct
lengths between 17 &21 feet.
Do not connect this appliance to the supply duct
of an existing furnace. This option is intended for
use with a single heat register.
Thumb Screws
Filter Cover
Filter
3-43-02730 ASH DOOR TILE
3-30-3110240382
BHSCS 10-24 X 3/8"
AD FILLER PLATE
3-44-11862 3/8" GASKET W/PSA
ASH DOOR