


12
Maintenance
A qualied service person recommended by your
Harman dealer should conduct an annual inspection and
maintenance of your Clarity, its venting, and the installa
-
tion to keep it running safely and efciently. These pro-
cedures should be performed only by a qualied service
person. The gas supply should be turned off whenever a
maintenance procedure is performed.
If the front panel, side doors, or front access door are
removed for servicing, they must be replaced prior to
operating the Clarity.
REMOVING THE GLASS FRONT
FOR REPLACEMENT
Refer to page 6 for directions on removing the glass
front. Use only authorized Harman replacement glass
components available from your dealer.
REPLACING THE GASKET
The Clarity has 5/8" diameter berglass gasket in the
front door. Should it ever need replacement, use only the
proper replacement gasket that is available from your
Harman dealer. To replace the gasket, follow this proce
-
dure.
1. Open the door
2. Remove the existing gasket and clean its channel
with a scraper or wire brush.
3. Lay a thin bead of high temperature silicone the
entire length of the channel.
4. Lay the gasket in the channel with sufcient pressure
that is stays in place.
5. Trim the excess from the end of the gasket so that it
butts snugly against the other end without leaving a gap.
Seal the end joint with high temperature silicone.
6. Close the door and apply rm pressure to seat the
gasket evenly throughout.
CLEANING THE GLASS
The glass may be cleaned with ordinary household
glass cleaner and a soft cloth or paper towel.
WARNING: Never clean the glass when it is hot. Do
not use abrasive cleaners on the glass.
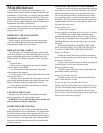
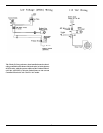
INSPECTING THE VENTING
An inspection of the venting system should be made
during the annual service appointment. The system must
have no blockage and must be in good repair. The vent
manufacturer's instructions may provide specic sugges-
tions or details on vent inspection. Any sections that are
taken apart for the inspection must be reassembled and
sealed as required.
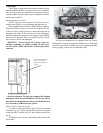
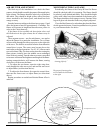
CLEANING THE LOG SET AND FIREBOX
During the annual inspection and maintenance appoint-
ment, the service person should clean dust, lint, and any
light accumulation from the logs and the rebox area.
An extra-soft brush should be used on the logs as they
are extremely fragile; a vacuum cleaner may be used on
the rebox. If at any time the logs cannot be removed or
installed without forcing, the cause must be found. The
logs must never be forced.
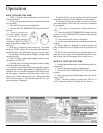
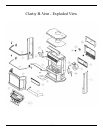
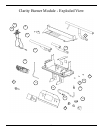
Removing the Front
See directions on page 6.
Removal and Re-installation of the Log Set for Cleaning
CAUTION: The ceramic logs are durable when
handled and installed properly. However, they are deli
-
cate and may be damaged easily if not handled with care.
Handling damage to the ceramic logs is not covered by
warranty.
DO NOT HANDLE LOGS WHILE THEY ARE
HOT. ALLOW PLENTY OF TIME FOR THE STOVE
TO COOL COMPLETELY BEFORE HANLDING.
Remove the Branch
Detach the branch from the two locator pins and re
-
move it. Brush it gently and carefully place it to one side.
Remove the Center Log
Lift the center log and remove it. Brush it gently and
carefully place it to one side with the branch.
Remove the Ember Strips
Carefully remove the ember strips, clean them, and
place them with the other logs.
Remove the Side Brick Panels
Carefully remove rst one side panel, and then the
other. Clean and place to side.
Remove the Back Log and Back Brick Panel
Finally, carefully remove these two components as a sin
-
gle piece. Brush them gently and place them to the side.
Finish the procedure by vacuuming the interior of the
rebox, then re-install the logs and secure the glass front
following the procedures on page 7.