


SKU 65322 or 65323 For technical questions, please call 1-800-444-3353. Page 14
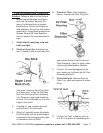
Place a drain pan (not included) un-1.
derneath the crankcase’s drain plug.
Remove the Dip Stick and Oil Drain 2.
Plug and, if possible, tilt the crank-
case slightly to help drain the oil out.
Recycle used oil.
Replace the Oil Drain Plug and gas-3.
ket and tighten it.
Remove the cap from the Oil Fill Port. 4.
Using a siphon, rell the oil to the
proper level. Replace the cap on the
Oil Fill Port.
Recheck the oil level, using the dip-5.
stick. Add or remove oil if necessary.
Do not operate the engine with too
much or too little oil.
Inspect before operation.6.
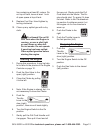
Air Filter Element Maintenance
Wipe off the air cleaner cover.1.
The air cleaner cover is held in place 2.
by a wing nut or clamps. Remove it.
Remove the air lter element.3.
Cleaning:4.
For “paper” lter elements: a.
To prevent injury from dust and
debris, wear ANSI-approved safety
goggles, NIOSH-approved dust
mask/respirator, and heavy-duty
work gloves. In a well-ventilated
area away from bystanders, use
pressurized air to blow dust out
of the air lter from the side oppo-
site the lter’s normal air ow (the
“clean” side of the lter).
If this does not get the lter reason-
ably clean, replace it.
For foam lter elements: b.
Wash the element in warm water
and mild detergent several times.
Rinse. Squeeze out excess water
and allow it to dry completely. Soak
the lter in lightweight oil briey, then
squeeze out the excess oil.
Install the new lter or the cleaned 4.
lter. Secure the Air Cleaner Cover
before use.
Spark Plug Maintenance
Disconnect spark plug wire from 1.
end of plug. Clean out debris from
around spark plug.
Using a spark plug wrench, remove 2.
the spark plug.
Inspect the spark plug: 3.
If the electrode is oily, clean it using a
clean, dry rag.
If the electrode has deposits on it,
polish it using emery paper.
If the white insulator is cracked or
chipped, the spark plug needs to be
replaced.
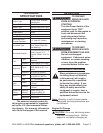
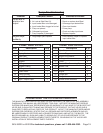
When installing a new spark plug, ad-4.
just the plug’s gap to the specication
on the Technical specication chart
(page 14). Do not pry against the
electrode or the insulator, the spark
plug can be damaged.
Install the new spark plug or the 5.
cleaned spark plug into the engine.
Gasket-style: Finger-tighten until the
gasket contacts the cylinder head,
then about 1/2-2/3 turn more.
Non-gasket-style: Finger-tighten until
the plug contacts the head, then
about 1/16 turn more.
Apply dielectric spark plug cap pro-6.
tector to the end of the spark plug
and reattach the wire securely.