


Page 6SKU 03914
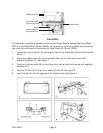
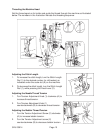
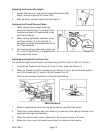
6. Fit the machine head to the table rubber hinges (F) before placing the machine head
on the corner seats. See figure 4.
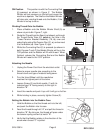
7. Tilt the machine back to expose the Oil Pan (D). See figure 5.
8. Fill the Oil Pan with sewing machine lubrication oil (#7 white oil) to the “high” mark “A”.
Add more oil when the level is to the “low” mark “B”. After lubrication, and during
operation, oil splashing can be seen through the Oil Sight Window (H).
9. Lower the machine head to the table top.
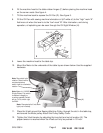
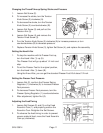
10. Mount the Motor to the underside of the table top as shown below. Use the supplied
hardware.
11. Place the V-belt around the Sewing Machine Pulley, through the slot in the table top,
and around the Motor pulley. Attach the Pulley Safety Cover.
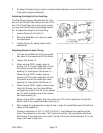
12. Tighten the V-belt tension by adjusting the long bolt and nut at location (K). The
proper tension is reached when the V-belt can only be pushed in 1/2 inch.
(K)
Note: Top switch is for
rotation. Switch left for
counterclockwise;
switch right for clockwise
rotation.
Note: Motor is 110/220V
Single Phase. Flip switch
to desired voltage (no
re-wiring needed). Switch
left for 110V, switch right
for 220V.
Note: Receptacle for 6 volt work
light (not included).
REV 04/03 REV 05/03