


Repair
308391J 11
Repair
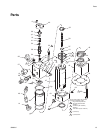
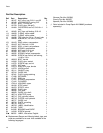
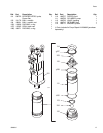
Refer to Parts Drawing on page 15 unless otherwise
specified.
NOTE:
• Spool valve Repair Kit 220457 is available to
replace the gaskets (29), spring retaining plugs (31),
springs (21), spool (38), trip rod (33) and piston stop
(37). The spool, plugs, and springs must be
replaced as a group.
• Clean all parts as you disassemble them, and
inspect for wear or damage. Replace parts as nec-
essary. Use Loctite
®
TL-242 thread sealant, or
equivalent, when thread sealant is specified.
• Pump Repair Kit 236862 is available to replace the
gasket (29), o-rings (11, 12, 105 and 108) seals
(17), packing (107), and piston rings (15).
Disassembly
Refer to Parts Drawing on page 15 unless otherwise
specified.
1. Relieve the pressure (page 8), and stop the pump at
the bottom of its stroke.
2. Disconnect the displacement pump hoses. Discon-
nect the hydraulic hoses and plug all hydraulic con-
nections and lines to prevent contamination.
3. Place the hydraulic motor horizontally in a bench
vise at the pump adapter (42) and bottom cylinder
cap (43).
4. Remove the displacement pump with a strap
wrench.
5. Remove the cap screws (25) and the mounting plate
(46).
6. Remove the hydraulic motor from the vise.
7. Place the piston (110) flats in the vise.
8. Loosen, but do not remove the piston rod (44) with a
wrench.
9. Remove the piston (110) flats from the vise.
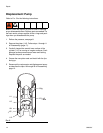
10. Place the motor vertically in the vise at the pump
adapter (42) and the bottom cylinder cap (43).
11. Remove the piston (110), ball (103), and seal (107).
NOTE: The socket screw (9), cap screws (22), and
retainer (32) are fastened with Loctite
®
TL-242. Heat
may be used sparingly to soften the adhesive during dis-
assembly.
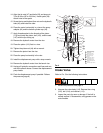
12. Remove one detent assembly retaining plug (31),
spring (21), gasket (29), ball guide (30), and ball (7).
If the ball or other parts stick in the upper housing
(36), use a magnet to extract the parts. Do not allow
the parts to fall into the motor. Repeat the procedure
for the other detent assembly.
13. Unscrew the top and bottom flare nuts on the
hydraulic tube (49), and remove the tube. Allow the
oil to drain from the motor into a pan.
14. Remove the socket screws (9), and remove the end
cap (40).
15. Remove the bolts (23), but do not remove the rods
(47).
To avoid serious injury, do not move this unit without the
use of lifting equipment. Keep the hoist attached for
steps 1 through 15.
NOTICE
Avoid getting dust or dirt in the motor during repair.
Cleanliness is essential when repairing a hydraulic
motor.
NOTICE
To prevent damage to the spool (38) and the upper
housing (36), remove the detent parts (31, 21, 29, 30,
and 7) before removing the end cap (40).