


6
Care and cleaning of the reverse osmosis system.
To obtain replacement filters, call toll-free GE Appliance Parts at 800-626-2002 (U.S.),
800-663-6060 (Canada–English), 800-361-3869 (Canada–French).
CAUTION: Before servicing the Reverse Osmosis system, close the water supply/saddle valve and open
the RO water faucet. Allow the system to drain.
Prefilter/Postfilter Cartridge Replacement FX12P Carbon Block
Reverse Osmosis Cartridge Replacement FX12M Thin Film Polyamide
Prefilter and Postfilter Cartridge Replacement
Follow the steps in the Sanitizing the Reverse Osmosis System section EXCEPT discard the old filters and
replace with new filters.
The Water Test Kit
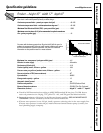
This Reverse Osmosis system contains a replaceable treatment component, critical for effective
reduction of Total Dissolved Solids (TDS). This product water shall be tested periodically to verify
that the system is performing satisfactorily. Follow instructions included in the kit. Product water
should be tested a minimum of every six months. A replacement test kit will be provided to you with
the results of each test submittal.
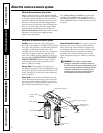
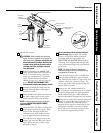
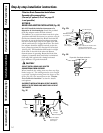
Be sure you clean your hands with anti-bacterial
soap before handling inner parts of the system.
Turn
off
the water supply valve to the Reverse
Osmosis System
. Open the RO water faucet
and leave the storage tank open. Allow the
water in the system to drain completely
(this takes several minutes).
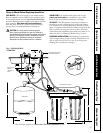
If the Reverse Osmosis Filtration system is
connected to your icemaker, YOU MUST
turn off the icemaker by raising the feeler
arm before servicing the filter, changing the
filters or purging the filtration system. Four
hours after servicing your unit, lower the
feeler arm to resume icemaking.
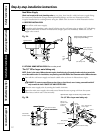
Pull the Reverse Osmosis System out away
from the cabinet but do not disconnect any
tubing. Place a dry towel under the Reverse
Osmosis Unit to absorb water that will spill
out during disassembly.
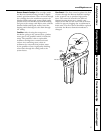
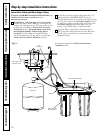
Unscrew inlet cover cap to open Reverse
Osmosis housing.
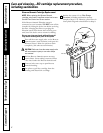
Sanitizing the system is done with the Reverse
Osmosis Cartridge and filter cartridges removed
from the system.
Remove the Reverse Osmosis Cartridge
from the housing by grasping the end of the
cartridge with the clean pliers and pulling
to the right.
NOTE: Water may be discolored when removing the
cartridge—this is NORMAL. Place the cartridge in a
clean plastic bag to protect the cartridge from
damage until it is reassembled.
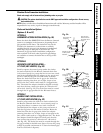
Reinstall the inlet cover, making sure the
O-ring is in place.
Remove the POSTFILTER sump by turning
it to the left using the sump wrench that was
provided with the Reverse Osmosis System.
Be careful when removing the sump because
it is full of water. Remove the old filter
cartridge from the sump and discard. Inspect
the sump. Make sure the O-ring is seated in
the top of the sump. Reinstall the sump
(without the cartridge) to sanitize.
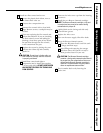
Remove the PREFILTER sump using the
sump wrench and discard the old cartridge.
Make sure the O-ring is seated in the top of
the sump.
7
6
5
4
3
2
1
Consumer Support
Troubleshooting Tips Operating Instructions Safety InstructionsInstallation Instructions
Care and cleaning—RO cartridge replacement procedure,
including sanitization.