


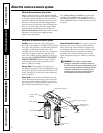
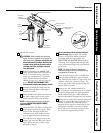
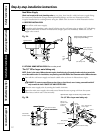
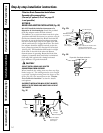

Install new flow control and screen.
Locate the plastic drain elbow, next to
the brass check valve tee.
Unscrew the compression nut.
Remove flow control with a clean knife
edge. Remove screen; a toothpick may be
needed.
If you are replacing the flow control and
screen,
discard them. If you are checking
the flow control,
screen and tubing for
blockage, clean these parts of any debris.
Do not blow through the flow control,
it will contaminate the part.
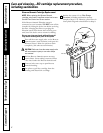
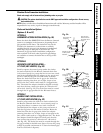
Replace the screen by placing the cone
end into the elbow cap and carefully
push it in.
C
AUTION: Do not force in further after you
feel resistance. Visually check to be sure it
is properly positioned.
I
nstall flow control and tighten
compression nut by hand, then another
1/4 turn with pliers. DO NOT OVERTIGHTEN
AND DISTORT OR CRUSH THE TUBING AND
FLOW CONTROL.
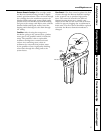
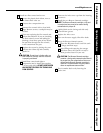
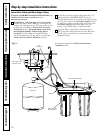
Unscrew the inlet cover cap from the housing
to remove.
Install the new Reverse Osmosis cartridge.
NOTE: The Reverse Osmosis cartridge o-ring end
is notched and may need to be rotated during
reinstallation for proper fit.
Lightly lubricate the O-ring seal with only
clean silicone grease.
Replace the inlet cover.
Turn on the water supply. Check for leaks.
Purge the Reverse Osmosis system.
Open the RO water faucet until the tank
is empty and flow stops.
After filling and emptying the storage
tank four times, the system is ready to
make product water for your use.
CAUTION: The Reverse Osmosis cartridge
contains a food grade preservative that should
be purged from the system before first use or
whenever the Reverse Osmosis cartridge is
replaced. The preservative will give product
water an unpleasant taste
and odor.
Turn icemaker back on by lowering the
feeler arm.
13
b
a
12
11
10
9
8
7
f
e
d
c
b
a
6
Consumer Support
Troubleshooting TipsOperating Instructions
Safety Instructions
Installation Instructions
9
www.GEAppliances.com