


Installation Instructions
4
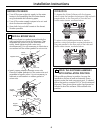
UNPACKING AND INSPECTION
Be sure to check the entire softener for any
shipping damage or missing parts. Also note
damage to the shipping cartons. Contact the
transportation company for all damage and loss
claims. The manufacturer is not responsible for
damages in transit.
Small parts needed to install the softener are
packaged either in a bag or box. To avoid loss
of the small parts, keep them packaged until you
are ready to use them. Be sure not to discard
components hidden in packaging.
TOOLS AND MATERIALS REQUIRED
FOR INSTALLATION
• Teflon tape
• Razor knife
• One adjustable wrench
• 1/2″ vinyl/pvc drain line (the length required will
be determined by your specific location)
• Additional tools may be required if modification
to home plumbing is necessary.
• In and out fittings included with the softener
are 1″ copper adapters. You should maintain
the same, or larger, pipe size as the water supply
pipe, up to the softener inlet and outlet. Then,
use the necessary adapters to connect the
water supply to the 1″ copper adapters.
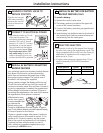
• Use the included bypass valve to install the
softener. The bypass valve allows you to turn off
water to the softener for servicing, but still have
water pressure in the house pipes.
• Use appropriate fitting/pipe material (i.e., copper,
brass, galvanized or CPVC) to connect the 1″
copper adapters to the house plumbing.
• If a rigid valve drain is needed to comply with
plumbing codes, you can buy the parts needed
to connect a 1/2″ copper tubing or plastic pipe
drain.
• Clean nugget or pellet water softener salt is
needed to fill the brine tank.
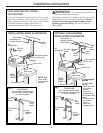
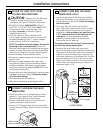
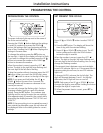
WHERE TO INSTALL THE SOFTENER
• Place the softener as close as possible to a
sewer drain, or other acceptable drain point
or standpipe.
• It is recommended to keep outside faucets
on hard water to save soft water and salt.
• Do not install the softener in a place where it
could freeze. Freeze damage is not covered by
the warranty.
• Do not install the softener where it would block
access to the water heater or access to the main
water shutoff.
• Put the softener in a place where water damage
is least likely to occur if a leak develops. The
manufacturer will not repair or pay for water
damage.
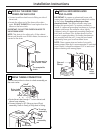
• A 120-volt electric outlet is needed to plug in the
included transformer. The softener has a 10-foot
power cable. If the outlet is remote (up to 100
feet), use 18 gauge wire to connect. Be sure the
electric outlet and transformer are in an inside
location, to protect from wet weather. Be sure
the outlet is unswitched to prevent accidental
shutoff.
• If installing in an outside location, you must
take the steps necessary to assure the softener,
installation plumbing, wiring, etc., are as well
protected from the elements (sunlight, rain, wind,
heat, cold), contamination, vandalism, etc., as
when installed indoors. Outdoor installation is
not recommended, and voids the warranty.
• Keep the softener out of direct sunlight.
The sun’s heat may distort non-metallic
parts and may damage the electronics.