


20
INSTALLATION INSTRUCTIONS
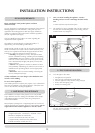
PR8054
All models
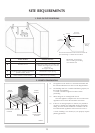
Flue pipe x 612 long
Seal Collar with
fire cement
Self tapping screws
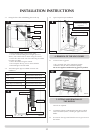
2.2 Connect a flue pipe 612mm long by inserting it into the flue
spigot and seal using fire cement. Fit the cast iron finishing
collar over the flue pipe and locate into recess in the top
cover
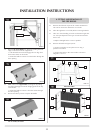
PR8052
Connection to chimney as detailed
in Building Regulations
135 Elbow with
access cover
Flue Pipe x 612 long
600mm minimum
1000mm max
unsupported
All Models
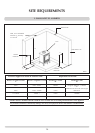
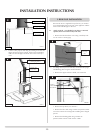
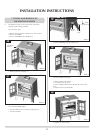
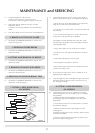
3. REAR FLUE INSTALLATION
Because the stove is supplied for top flue exit, you need to
move the blanking plate to the top of the appliance and the
fit the collar and flue pipe to the rear:
3.1 (Tools required - cross-headed screw driver, 10mm A/F
spanner/socket wrench and a key hole saw).
• Removethefluebreak-outcoverusingasmallkeyhole
saw to cut the 3 securing lugs
PR8064
3 Small Lugs
Cut Using
Saw
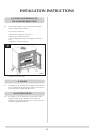
3.2 To change from top to rear exit flue, reverse the flue spigot
and blanking plate using the method detailed.
• Removetheupperandlowerbaffle,seeSectionXX
PR8065
Flue collar
Upper &
Lower Baffle
Rear bricks
Blanking
cover
• Removethetopbricks,seeSection5
• Removethefluecollarusinga10mmA/Fspanner/socket
wrench to remove the 4 fixing bolts including the 2 flanged
spacers
•Removetheblankingplateusinga10mmA/F
spanner/socket wrench to take out the 4 bolts