


9
MAINTENANCE and SERVICING
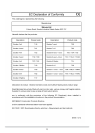
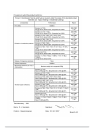
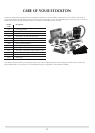
See chart on page 10 for common spare parts refered to in this section.
For a complete list of spare parts and accessories contact your Stovax dealer for the
Stovax Fireplace, Stove & Hearth Accessories brochure or call 01392 474011
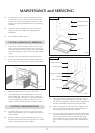
1. GENERAL CLEANING
Before any cleaning is carried out, allow stove to cool
thoroughly to avoid risk of burns.
1.1 We would recommend that your Stockton stove be cleaned
fully on a regular basis, according to the level of use.
Attention should be given to cleaning the baffle system,
flueways and removing ash. Regular cleaning and preventive
maintenance will help give many years of safe use.
1.2 The external paintwork may be cleaned using warm soapy
water and a soft clean cloth. Wipe dry with a soft clean
cloth before re-lighting. Do not leave unit without drying, as
this may cause rust.
2. CLEANING GLASS
2.1 While the correct use of the Airwash system, and good
quality fuel, will generally keep the glass clean when the
appliance is used you may sometimes need to clean the
glass.
2.2 This can be done as follows. Allow the Stockton stove to
cool fully, never attempt to clean hot glass. Any deposits
can be removed using a soft cloth and Stovax Glass Cleaner.
2.3 Before re-lighting the appliance, dry the glass fully.
2.4 Do not use abrasive cleaner or cleaning pads.
3. CHIMNEY SWEEPING
3.1 We would recommend that to maintain the safe and
efficient use of the appliance the flue / chimney is inspected
and swept at least once a year, by a NACS Registered
(UK only) / INFO Registered (Eire only) chimney sweep,
who will issue you with a certificate.
4. ANNUAL SERVICE
At the end of the heating season it is recommended to strip,
inspect and clean the stove as detailed: -
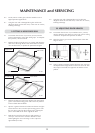
4.1 Carefully remove all of the following internal parts. 2
internal baffles, firebricks, complete grate (2 parts), and
ashpan. See sections 6 and 7 for the instructions on how
to remove the baffles and firebricks. Care should be taken
when handling firebricks, as they can become fragile after a
period of use.
4.2 Vacuum clean any remaining ash and debris from the inside
of the stove. Stovax offer a filter / collection attachment for
your vacuum cleaner to protect it from fine ash. Ash clean
(Stovax Part No. 2091).
4.3 Clean the internal surfaces of the stove using a wire brush
and scraper as required. Vacuum and brush the resulting
debris from the stove.
4.4 Clean the baffle and grate parts with a wire brush, and
check the parts for any damage. Replace any damaged
parts.
4.5 Check and clean the firebricks with a soft brush. Replace
any broken bricks. It is normal for some surface damage to
occur during use.
4.6 Re-fit cleaned internal parts.
4.7 Remove the glass from the door, see section 8, and discard
all old rope seals.
4.8 Remove the door rope seal from the outer edge of the door
and clean the old glue from the door sealing rope grove.
4.9 Clean the door glass using Stovax Stove Glass Cleaner and
a soft cloth, do not use abrasive cleaners to remove tar or
soot deposits from the glass.
4.10 Replace the glass edge seal with new and re-fit the glass into
place in the door. (See section 8, page 11).
4.11 Fit new door rope seal with the joint in the middle of
the lower edge of the door, gluing it in place with Stovax
Thermic Seal rope adhesive (See section 9, page 12). When
fitting new door seals we recommend closing the stove door
and leaving for at least 12 hours before using. This allows
the adhesive to fully bond to the seal before use.
4.12 Lightly oil the door catch mechanism and hinge pins. Avoid
getting oil onto the door seals and glass.
4.13 To refresh painted finishes it is possible to re-paint using
Stovax Thermolac stove paint.
4.14 We recommend that only genuine Stovax replacement
parts are used to keep your appliance in safe and efficient
working order. Your local Stovax dealer will be able to
provide you with the genuine parts you require.