


11
MAINTENANCE and SERVICING
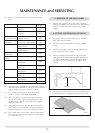
6.6 It is important to remove and clean the baffle system to
ensure the flue ways are clear of soot and debris and to
ensure the safe and efficient operation of the stove. The
frequency of cleaning will depend on the stove operating
conditions.
6.7 The baffle system is designed to give safe and efficient
operation of the stove. Replace any damaged baffles
immediately.
6.8 Do not modify the baffle system.
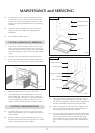
7.1 As part of the routine maintenance of the stove you may
have to remove the firebricks from the stove. This can be
carried-out without the use of tools, but the bricks must be
removed and replaced as shown, after removing the baffle
system.
7.2 Allow the stove to cool fully before removing firebricks.
7.3 If your stove is fitted with 4 upper firebricks, remove the
lower 2 bricks first. Then lower the top bricks and remove.
7.4 Replace the bricks in the reverse order of removal.
7.5 Care should be taken when handling bricks, as they can
become fragile after a period of use. This is normal and
the life will depend on the type of fuels burnt and the level
of use. Damaged bricks should be replaced as soon as
possible, and can be purchased from your Stovax dealer.
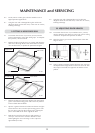
8.1 To maintain the safe use of your stove you may need to
replace a damaged door glass. To complete this operation,
use this method.
8.2 Remove the door, by opening and lifting the door free of
the hinge blocks. Then lie the door face down on a soft flat
surface, to protect the paintwork and glass.
8. FITTING A NEW DOOR GLASS
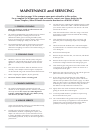
8.3 Using a screwdriver remove the glass clip fixing screws (4).
The old glass can then be lifted clear of the door. (Note
how the 3mm sealing rope is placed between the glass and
the door.) Remember to dispose of the old glass safely.
8.4 Clean, and re-paint, the rear of the door if required. Clean
the screws with light oil and coat with high temperature
anti-seize grease, this will aid future removal.
8.5 Fit a new sealing rope between the new glass and the door,
and place the glass into position in the door. Place the glass
fixing clips into position and re-fix with the clean fixing
screws, tighten the screws evenly until the clips hold the
glass. Do not over tighten the clips as this could break the
glass.
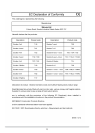
Fixing Screws (x10)
Fixing Clips (x4)
Fixing Clip Long (x2)
Glass (x2)
Glass Seal (3mm)
Door (x2)
7. FITTING & REMOVAL OF FIREBRICKS
PR7211
Fixing Screws (x4)
Fixing Clips (x4)
Glass
Glass Seal
Door
PR7080
PR7081
Single Door
Double Door