


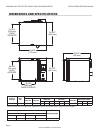

GARLAND HALF SIZE ELECTRIC CONVECTION OVEN MODEL:MCOE5
INSTALLATION/OPERATION MANUAL
Page 12
Part # 4516833 Rev C (19 Mar 2014)
Check Calibration
Tools: digital thermometer with probe, oven mitt.
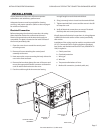
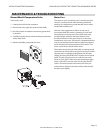
1. Clamp the probe in the center of the middle rack. Pass
the probe wire out of the oven between the door and
the door seal and close the oven door. Plug the probe
wire into the thermometer.
2. Press the oven on/o switch.
3. Allow the oven to preheat to 375°F for approx. 30
minutes before calibrating.
4. Record the values displayed on the thermometer when
the HEAT ON LED goes o , and again when it goes back
on. The average of these 2 numbers is the temperature
at which the oven is cycling. This is the value used to
calibrate the oven.
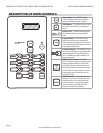
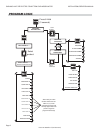
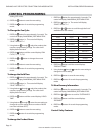
5. To begin programming, press and hold the PROG
button until the display changes to main menu/edit
menu item.
6. Press the 2 or 8 button to toggle through main menu to
service menu.
7. Pressing the PROG button again will advance to
CAL/OFFSET. The 2 or 8 buttons can be used to
increment the o set by 1 degree per button push.
The o set can be + or -. The factory default will be 0,
(no o set). If there is already o set programmed, add
or subtract the number found in Step 4 to/from the
existing o set. Press the PROG button and then the
start button to exit the service menu program mode
and nish the calibration.
Example: Recorded temp: 380°F, (step 4), set temp: 375°f—
the o set would be +5 to calibrate. Subtract the set temp
from the recorded value and that will give the +/- value to
use (380-375=+5).
Maximum o set of +/- 50°f can be entered in calibration
mode
8. After entering a calibration o set, if necessary, allow
the unit to cycle and verify calibration by repeating
Step 4. The value found in Step 4 should match the set
temperature.
9. Press the VIEW/UTILITY button, then START to put the
unit into the FAST COOL mode.
10. Wait 3 minutes with oven in FAST COOL, then
using an oven mitt, remove the oven probe.
Break-In Period
When oven is new, operate it for one hour at 375°F before
you begin your normal cooking operation. After cooling,
wipe the interior, including the racks, with a clean damp
cloth.
NOTE: Disconnect the oven from its from power supply
before cleaning or servicing.
Exterior Cleaning
Establish a regular schedule. Any spills should be wiped o
immediately.
1. The oven should always be allowed to cool
su ciently,using FAST COOL, before any cleaning is
attempted. See “VIEW/UTILITY Button” on Page 12.
2. Wipe exposed, cleanable surface when cool with a mild
detergent and hot water. Stubborn residue spots may
be removed with a lightweight non-metallic scouring
pad. Dry thoroughly with a clean cloth.
3. Stainless Steel surfaces can often be cleaned
adequately with the same method. Stubborn stains
may be removed by using a non-metallic abrasive
pad, rubbing in the direction of the metal’s grain. If
necessary, for particularly heavy deposits, you may mix
a thin paste of water and scouring powder, and apply
it with a sponge. Be careful to apply light pressure and
remember to rub only in the direction of the grain in
the metal.
4. The control panel surface is easily cleaned with hot
water, soap and a soft cloth. Do not use hard abrasives,
solvent type materials or metallic scouring pads since
these will scratch or cloud the surface.
5. Never spray the perforated areas or control panel
with steam or water, as this will allow moisture into
the control cavity, which could damage electrical
components.
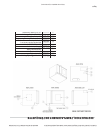
MAINTENANCE & TROUBLESHOOTING